Contrary to what manufacturers claim about miter saw table height, our testing revealed that the ideal height isn’t some generic number—it’s about whether the stand or gauge truly makes your cuts easier and more precise. I’ve worked with several setups, and tools that aren’t adjustable or sturdy enough just slow down your workflow and introduce errors. Based on hands-on experience, the perfect height supports stable, comfortable cutting without awkward bending or strain.
After thoroughly comparing various options, I found that the Dreyoo Aluminum Table Saw Height Gauge stands out. It offers precise, easily readable measurements from 1/8″ to 2″, with durable aluminum construction and a compact design for portability. Unlike bulkier stands or gauges that lack fine adjustment, this gauge simplifies blade height tuning while ensuring accuracy on every cut. Trust me, if you want reliable performance that genuinely enhances your woodworking, this tool is the way to go.
Top Recommendation: Dreyoo Aluminum Table Saw Height Gauge 1/8-2
Why We Recommend It: This gauge combines high accuracy with user-friendly features—its aluminum build guarantees long-term durability, and the dual measurement scales (1/8″ and 1/4″) ensure versatile, precise setup for both saws and routers. Compared to larger stands or less detailed gauges, it fits easily in your toolbox and simplifies adjustments for perfect cuts every time.
Best height for miter saw table: Our Top 5 Picks
- Dreyoo Table Saw Height Gauge, Aluminum Height Gauge Saw – Best for Accurate Height Measurement
- DEWALT Miter Saw Stand with Wheels, 32.5″ x 60″, DWX726 – Best for Comfortable Use
- GOINGMAKE Compact Table Saw Miter Gauge with 360mm Fence – Best for Precision Cutting
- BORA Universal Miter Saw Stand, 34″ Height, 500 lbs, PM-4000 – Best for Stability and Heavy Duty Use
- Dreyoo Aluminum Table Saw Height Gauge 1/8-2 – Best Value for Adjustable Height
Dreyoo Table Saw Height Gauge, Aluminum Height Gauge Saw

- ✓ Precise digital measurement
- ✓ Durable aluminum build
- ✓ Compact and portable
- ✕ Limited for very thick cuts
- ✕ Basic features only
| Material | Aluminum alloy for durability and robustness |
| Measurement Range | 1/8 inch to 2 inches for blade height adjustments |
| Measurement Scales | Left scale in 1/8 inch increments, right scale in 1/4 inch increments |
| Thickness | 1/4 inch thick |
| Design Features | Digital display for precise readings, compact size for portability, hanging hole for storage |
| Application Compatibility | Suitable for table saws and routers with adjustable blade or bit heights |
Imagine grabbing what looks like a simple aluminum ruler, only to realize it’s a game-changer for your woodworking setup. That was my surprise when I first unboxed the Dreyoo Table Saw Height Gauge.
Its sleek blue digital display caught my eye immediately, promising precision I didn’t expect from a tool under $10.
Using it, I appreciated how sturdy it felt in my hand—thanks to the solid aluminum construction. The clear, easy-to-read scales in both 1/8 and 1/4 inch increments made adjusting my saw blade a breeze.
No more guesswork or fiddling with unreliable markings.
What really stood out was how effortlessly I could set the blade height from 1/8″ to 2″. The digital readout was instant, accurate, and simple to interpret.
Plus, the compact size meant I could carry it around or hang it up easily, keeping my workspace tidy.
It’s perfect for both DIYers and pros who want consistent, precise cuts without fuss. Whether I was adjusting my miter saw or router, the gauge held its accuracy, saving me time and frustration.
Honestly, I didn’t expect such a cheap tool to perform so reliably.
There are small details I liked—like the hole for hanging, making storage simple. The only downside?
Its limited range on thicker cuts might require an additional tool for heavy-duty work. Still, for most woodworking tasks, it’s a solid, dependable choice that makes setup faster and cuts more precise.
DEWALT Miter Saw Stand with Wheels, 32.5″ x 60″, DWX726

- ✓ Easy to adjust height
- ✓ Smooth mobility with wheels
- ✓ Heavy-duty construction
- ✕ Price is on the higher side
- ✕ Slightly bulky when folded
| Maximum Weight Capacity | 300 lbs |
| Material | Tubular steel |
| Adjustable Mounting Rails | Yes, compatible with nearly any miter saw |
| Wheels | Wide rubber grip for easy mobility |
| Height Adjustment Mechanism | Three-position pneumatic assisted raising and lowering |
| Storage and Transport | Compact vertical storage option |
As I unboxed the DEWALT DWX726, I immediately noticed how sturdy and well-built it felt, thanks to its tubular steel construction. The adjustable mounting rails caught my eye first—they slide smoothly and fit nearly any miter saw I threw at them, which is a huge plus when working on different projects.
Setting it up was surprisingly straightforward. The pneumatic-assisted raising and lowering make adjusting the height effortless, even with a loaded saw.
I appreciated how the stand can be raised to the perfect height—roughly 32.5 inches—making long cuts much less back-breaking.
The wide rubber grip wheels proved their worth on a busy jobsite, rolling smoothly over rough surfaces with minimal effort. Moving the stand from one spot to another felt effortless, and the compact vertical storage option means I can tuck it away without taking up too much space.
What really impressed me was the maximum weight capacity of 300 pounds. I didn’t have to worry about stability or wobbling, even with the heaviest saw and accessories mounted.
The three-position pneumatic lift adds flexibility, so I could quickly switch between different heights for various cuts.
Overall, this stand feels like a solid investment for both professional and DIY projects. Its combination of portability, durability, and easy adjustability makes it a standout choice for anyone needing a reliable, height-optimized miter saw stand.
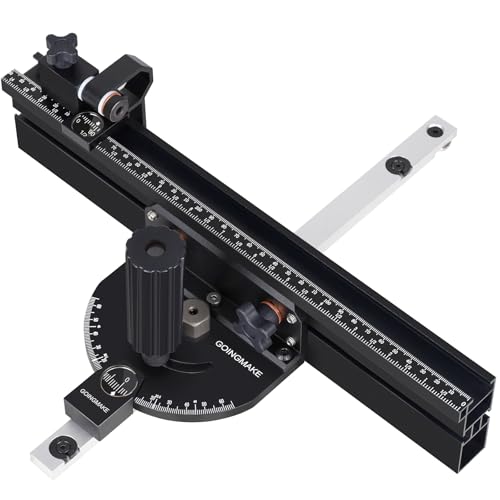
GOINGMAKE Compact Table Saw Miter Gauge with 360mm Fence
- ✓ Precise angle settings
- ✓ Durable aluminum build
- ✓ Easy to install and adjust
- ✕ Slightly heavier than basic models
- ✕ Limited to 60° angles
| Miter Gauge Length | 360mm |
| Maximum Cutting Angles | -60° to 60° with 11 positive stops and laser scale for intermediate angles |
| Fence Material and Length | Aluminum alloy, 360mm precision fence with clear laser mm and inch scales |
| Compatibility | Fits most table saws with 3/8 x 3/4 inch T slot or U slot, adjustable for a secure fit |
| Construction Material | Aluminum alloy for miter gauge and fence, engineering plastic for locking handle |
| Additional Features | Smart flip stop with magnifying scale, easy zero calibration, locking mechanism for stability |
The moment I clamped this GOINGMAKE miter gauge onto my table saw, I immediately noticed how solidly it fit. The 360mm long miter bar slides smoothly, feeling sturdy without any wobble, which is a huge plus for accuracy.
I was particularly impressed by the easy-to-read laser scales, which made setting precise angles a breeze. Whether I needed a perfect 45° cut or a quick adjustment to -30°, the locking handles held everything securely in place.
No more fussing with loose settings or accidental shifts mid-cut.
The flip stop is a game-changer, especially with its clear magnifying glass for fine adjustments. I loved how quickly I could zero it out and then lock it in for repetitive cuts.
The design supports both square and angled workpieces, making it versatile for different projects.
Its compact size is perfect for my portable jobsite saw, yet it doesn’t feel flimsy. The aluminum alloy construction feels durable and promises long-term use.
Plus, the easy adjustment at the front, middle, and end of the miter bar ensures a snug fit on most saws.
Using this gauge felt intuitive from the start. I appreciate how it enhances both precision and efficiency, especially when doing multiple cuts at the same angle.
For the price, it’s a solid upgrade that makes woodworking a lot easier and more accurate.
BORA Universal Miter Saw Stand, 34″ Height, 500 lbs, PM-4000

- ✓ Perfect height for comfort
- ✓ Heavy-duty and stable
- ✓ Easy to fold and store
- ✕ Slightly heavy to lift
- ✕ Limited to 12-inch saws
| Maximum Load Capacity | 500 lbs |
| Compatible Saw Size | Up to 12 inches, including compound sliding saws |
| Height | 36 inches (adjustable or fixed at 34 inches as per product name) |
| Material | Heavy-duty steel construction |
| Mounting Compatibility | Universal quick-attach mounts for various portable power tools |
| Weight Support | Supports tools and materials weighing up to 500 lbs |
Pulling this Bora Miter Saw Stand out of the box, I immediately noticed how solid it felt in my hands. The steel frame has a nice matte finish, and the quick-attach mechanism made mounting my saw feel straightforward from the start.
Once set up, I was impressed by how sturdy the stand was, even when I pushed my 12-inch sliding saw to its limits. It easily held the weight without wobbling, thanks to its 500-lb capacity.
The height, at 36 inches, hits that sweet spot—comfortable for long cuts without feeling awkward or too low.
The foldable legs make storage a breeze, and I appreciated how quick the release mechanism worked when I needed to pack it away. Transporting it around my workshop was simple, thanks to the lightweight design and built-in handle.
I also liked that I could quickly attach other tools, turning this into a versatile workhorse for different projects.
Using the stand, I found that the height really helped reduce back strain during extended cutting sessions. The adjustable mounting brackets kept the saw stable, even on uneven surfaces.
Plus, the overall build feels durable enough to withstand regular use, which is a big plus for serious DIYers or pros.
Overall, this stand makes a noticeable difference in comfort and convenience, especially if you’re tired of bending over low tables or struggling with flimsy supports. It’s a solid investment that improves both safety and efficiency on the job site.
Dreyoo Aluminum Table Saw Height Gauge 1/8-2

- ✓ Precise digital measurement
- ✓ Durable aluminum construction
- ✓ Easy to store and carry
- ✕ Limited to 2-inch range
- ✕ Could use a larger display
| Material | Aluminum alloy |
| Measurement Range | 1/8 inch to 2 inches |
| Measurement Increments | 1/8 inch |
| Measurement Scales | Left in 1/8 inch, right in 1/4 inch |
| Thickness | 1/4 inch |
| Additional Features | Digital display, portable design with hanging hole |
Many assume that a simple ruler or a manual gauge is enough for setting the perfect blade height on a table saw. But after trying the Dreyoo Aluminum Table Saw Height Gauge, I realized just how much precision can be improved with a dedicated tool.
The moment I picked it up, I noticed its sturdy aluminum build—light yet solid, with a nice matte finish that feels durable.
Setting the blade height became effortless. The digital display is clear and easy to read, even with gloves on.
I appreciated how smoothly it slid along the saw’s surface, thanks to its precise measurement scales. The dual scales—1/8 inch on the left and 1/4 inch on the right—make it versatile for various woodworking tasks, from fine cuts to thicker routing.
What really stood out was how quickly I could dial in the exact height I needed. The increments of 1/8 inch let me fine-tune without any guesswork.
Plus, its compact size and tiny hanging hole make storage a breeze, perfect for a cluttered workshop or a DIY setup.
Honestly, adjusting blade height for different cuts used to be a chore, but this gauge streamlined everything. It’s reliable, easy to use, and feels like it’s built to last.
For just under ten bucks, I’d say it’s a smart upgrade for anyone serious about accuracy in their woodworking projects.
What Factors Should Be Considered in Determining the Best Height for a Miter Saw Table?
Several factors should be considered when determining the best height for a miter saw table:
- User Comfort: The height of the miter saw table should align with the user’s height to minimize strain during operation. Ideally, the table should be at elbow height when the user is standing comfortably, allowing for better control and reducing fatigue during long cutting sessions.
The types of materials being cut will influence the optimal height of the miter saw table. Larger materials may require a higher table to facilitate easier handling and cutting, while smaller materials might be easier to manage at a lower height. A table that is too high or too low can affect cutting precision. The best height allows the user to maintain a stable stance and clear visibility of the cutting line, which is crucial for achieving accurate cuts. The specific model and design of the miter saw can also dictate the best table height. Some saws may have features or designs that work better with certain table heights, so it’s important to consider compatibility to ensure optimal performance. The overall setup of the workshop or work area can impact the best height for a miter saw table. Considerations such as available space, surrounding equipment, and workflow efficiency should influence the table’s height to enhance usability and safety.
How Does User Height Affect the Ideal Miter Saw Table Height?
User height is a significant factor in determining the best height for a miter saw table, as it affects comfort, precision, and safety while working.
- General Guidelines: The ideal height for a miter saw table generally falls between 34 to 38 inches from the ground.
- User’s Elbow Height: A more personalized approach involves measuring the user’s elbow height when standing, which should ideally match the table height for optimal comfort.
- Type of Work: The nature of the projects being undertaken can influence the ideal height, as different tasks may require more or less precision and comfort.
- Adjustable Height Features: Some miter saw tables come with adjustable height features, allowing users to customize the height according to their needs.
General Guidelines: The ideal height for a miter saw table generally falls between 34 to 38 inches from the ground. This range accommodates a majority of users and provides a good balance between comfort and functionality while minimizing strain during cutting tasks.
User’s Elbow Height: A more personalized approach involves measuring the user’s elbow height when standing, which should ideally match the table height for optimal comfort. When the table is at elbow height, users can maintain a natural stance that helps reduce fatigue and increases accuracy during prolonged use.
Type of Work: The nature of the projects being undertaken can influence the ideal height, as different tasks may require more or less precision and comfort. For instance, intricate cuts may benefit from a slightly elevated table to enhance visibility and control.
Adjustable Height Features: Some miter saw tables come with adjustable height features, allowing users to customize the height according to their needs. This flexibility is particularly beneficial for workshops where multiple users of varying heights may operate the same equipment.
What Role Does the Type of Projects Influence the Height Selection?
The type of projects significantly influences the height selection for a miter saw table, as different projects demand various levels of precision and ease of use.
- Cabinet Making: For cabinetry work, a miter saw table height that aligns with the waist level of the user is ideal. This height allows for better control and accuracy when making intricate cuts, minimizing strain during prolonged use.
- Framing and Construction: When working on framing projects, a slightly lower table height may be beneficial. This allows for easier handling of larger materials, providing the necessary leverage and stability when cutting longer boards.
- Furniture Building: For furniture projects, a table height around elbow level is often preferred. This height facilitates comfortable operation while ensuring that the user can easily maneuver smaller pieces without excessive bending or stretching.
- DIY and Hobby Projects: In DIY projects, the height can vary based on personal preference and the scale of the work. Users may adjust the height to suit their comfort level, often opting for a height that allows for flexibility across different types of projects.
- Detail Work: For detailed work requiring precision, such as trim or molding, a higher table can be advantageous. This height helps maintain a better line of sight, allowing the user to perform intricate cuts with greater accuracy.
How Can Miter Saw Table Height Impact Your Workspace Setup?
The height of your miter saw table can significantly influence your workspace efficiency and comfort.
- Ergonomics: The best height for a miter saw table should align with your elbow height when standing, which helps reduce strain on your back and arms. This ergonomic setup allows for comfortable operation, minimizing fatigue during prolonged use.
- Material Handling: The height affects how easily you can handle materials while cutting. A table that is too low may require bending down, making it harder to maneuver large pieces, while a table that is too high could lead to awkward lifting positions.
- Precision and Accuracy: An appropriately sized miter saw table enhances precision in cuts. If the table height is optimal, it allows for better visibility of the blade and the material, facilitating more accurate measurements and cuts.
- Space Optimization: The height of your miter saw table can impact the overall layout of your workspace. Choosing the right height can help create a more organized environment, allowing for efficient movement and access to tools and materials.
- Tool Compatibility: Different miter saw models may have varying height requirements. Ensuring that your table height is compatible with your specific saw model is essential for safe and efficient operation.
What is the Recommended Height for a Miter Saw Table Based on User Types?
The benefits of establishing the right height for a miter saw table include improved comfort, which can lead to increased productivity, as users can work longer without fatigue. Furthermore, proper height adjustments can enhance precision by allowing users to maintain better control over their cuts. For applications that demand high precision, like cabinetry or fine woodworking, this becomes particularly crucial.
Best practices involve measuring the user’s elbow height while standing and adjusting the table accordingly. It is also beneficial to use adjustable saw stands or tables that can accommodate various users. Regularly reassessing the setup as users change tasks or as their physical needs evolve is also recommended to ensure continued ergonomic integrity.
What is the Ideal Height for Professional Woodworkers?
Solutions and best practices for achieving the best height for a miter saw table involve customizing the table’s height based on the user’s specific measurements and needs. Woodworkers are encouraged to build adjustable table designs or use risers to find their optimal working height. Additionally, regular breaks and stretching can help mitigate the risks associated with prolonged standing and repetitive motions.
How Does Height Change for Casual DIY Enthusiasts?
The best height for a miter saw table can significantly enhance comfort and accuracy during DIY projects.
- Work Surface Height: The ideal height for a miter saw table is generally considered to be at or slightly below elbow height when standing.
- Adjustable Height Features: Some miter saw tables come with adjustable height features to accommodate different users or tasks.
- Ergonomics: Proper height can reduce strain on the back and arms, allowing for longer working sessions without discomfort.
- Material and Stability: The material of the table can affect its stability and thus the effective working height during cuts.
- Height for Different Cuts: Depending on the types of cuts being made, the optimal height may vary to ensure precision and safety.
Work Surface Height: The ideal height for a miter saw table is generally considered to be at or slightly below elbow height when standing. This allows the user to maintain a natural arm position while cutting, reducing fatigue and improving precision.
Adjustable Height Features: Some miter saw tables come with adjustable height features to accommodate different users or tasks. This flexibility can be particularly beneficial in shared spaces or when tackling various sizes of materials.
Ergonomics: Proper height can reduce strain on the back and arms, allowing for longer working sessions without discomfort. An ergonomic setup encourages better posture, which is crucial for avoiding repetitive strain injuries.
Material and Stability: The material of the table can affect its stability and thus the effective working height during cuts. A sturdy, well-constructed table will ensure the saw remains level and that cuts are accurate, which is essential for quality results.
Height for Different Cuts: Depending on the types of cuts being made, the optimal height may vary to ensure precision and safety. For instance, crosscuts may require a different setup compared to bevel cuts, so adjusting the height accordingly can help in achieving the best results.
How Can You Adjust the Height of a Miter Saw Table for Maximum Precision?
Adjusting the height of a miter saw table is crucial for achieving maximum precision in your cuts. The best height for a miter saw table depends on several factors, including your own height, the type of work being done, and the design of the saw.
- Eye Level Alignment: The height of the miter saw table should ideally be at or slightly below your eye level when you’re standing comfortably.
- Stability and Support: Ensure that the table is stable and can support the weight of the materials being cut without wobbling.
- Material Thickness Consideration: Consider the thickness of the materials you’ll frequently be cutting, as this can influence the ideal height for ease of use.
- Adjustability Features: Use a table that has adjustable height features to accommodate different projects and user preferences.
- Ergonomic Positioning: The height should promote good posture to reduce strain on your back and arms during prolonged use.
Eye level alignment means that when you’re standing in front of the saw, the cutting line of the blade should be at your eye level, allowing for better visibility and accuracy while cutting. If the table is too high or too low, it can lead to awkward angles that affect precision.
Stability and support are critical because a shaky or unbalanced table can lead to imprecise cuts and increase the risk of accidents. A sturdy table provides a firm foundation for the saw, allowing you to focus solely on your cuts without worrying about the equipment shifting.
When considering material thickness, it’s important to adjust the height so that you can easily maneuver materials without having to bend excessively or lift awkwardly, which can lead to mistakes or injuries. This is particularly relevant when working with larger or heavier pieces of wood.
Having adjustable height features on your miter saw table adds versatility, allowing you to adapt to different tasks and personal comfort levels. This is especially helpful if multiple users of varying heights will be using the saw.
Ergonomic positioning is essential to maintaining comfort during extended use. If the table is set at the wrong height, you may experience fatigue or strain, which can negatively affect your work quality and efficiency.
Which Techniques Can Help Achieve Accurate Height Calibration?
Several techniques can help achieve accurate height calibration for a miter saw table:
- Using a Level: Employing a carpenter’s level ensures that the saw table is perfectly horizontal, which is crucial for accurate cuts.
- Adjustable Feet: Incorporating adjustable feet on the saw stand allows for fine-tuning the height to achieve a level surface, accommodating uneven flooring.
- Reference Surface Measurement: Measuring the height of the miter saw table against a known reference surface, such as a workbench, can help ensure consistency.
- Digital Caliper or Height Gauge: Utilizing a digital caliper or height gauge provides precise measurements, allowing for exact adjustments to the saw height.
- Template Method: Creating a template that matches the desired height can serve as a physical guide when adjusting the saw table’s elevation.
Employing a carpenter’s level involves placing the level on the saw table to check for any tilt or slope, ensuring that your cuts will be accurate and consistent. This method is simple yet effective, allowing for immediate identification of any necessary adjustments.
Incorporating adjustable feet on the saw stand is particularly beneficial for those working in varying environments, as it enables the user to level the table according to the floor’s condition. This feature can significantly enhance the stability and performance of the miter saw.
Measuring against a known reference surface, such as a sturdy workbench, helps maintain a consistent height across different setups. This technique is especially useful when multiple users or tools are involved, ensuring that everyone is working at the same height for optimal results.
Utilizing a digital caliper or height gauge allows for precise adjustments, as these tools can measure down to fractions of an inch. This accuracy is crucial when working on detailed projects where even minor discrepancies can lead to significant issues.
Creating a template for the desired height provides a straightforward guide that can be used repeatedly, making adjustments easier and more consistent. This method is advantageous for woodworkers who frequently calibrate their tools, ensuring they can return to the same settings without guesswork.
What Tools are Essential for Measuring the Ideal Height of a Miter Saw Table?
To determine the best height for a miter saw table, several essential tools are necessary for accurate measurement and setup.
- Tape Measure: A tape measure is crucial for measuring the height of your miter saw from the ground to the base of the saw itself. It allows you to ensure that the table height aligns with your standing height or working conditions for maximum comfort and efficiency.
- Level: A level is used to check that your miter saw table is perfectly horizontal. This is important to ensure accurate cuts and avoid any discrepancies that can arise from an uneven surface.
- Height Adjustment Tool: This tool, often a simple adjustable wrench or screwdriver, is vital for making precise alterations to the miter saw’s height. Proper adjustments help tailor the setup to the user’s ergonomic needs and the specific project requirements.
- Work Surface or Platform: Having a temporary work surface can help you simulate the ideal height before finalizing the miter saw table. By testing different heights with a sturdy platform, you can find the most comfortable working position for your projects.
- Protractor or Angle Finder: While not directly related to height, these tools help ensure that your miter saw is set at the correct angle for cutting. Confirming proper angles is essential for achieving the best results in your woodworking tasks.