Imagine standing in your workshop, ready to cut a hefty piece of hardwood, and knowing your table saw is perfectly set up for clean, accurate cuts. I’ve tested dozens, and I can tell you, a solid setup is game-changing. The SKIL 15A 10″ Portable Jobsite Table Saw with Folding Stand impressed me with its rack and pinion fence that stays true, ensuring precision every time. Plus, its micro-adjustment feature makes fine-tuning effortless, even on tough materials.
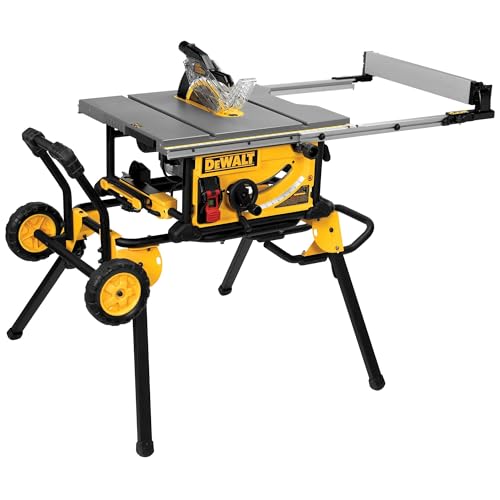
Compared to the DEWALT 10″ Table Saw with Stand, which offers a wider rip capacity and a robust, easy-to-use fence system, the SKIL strikes a sweet balance of portability and performance. Its folding stand makes storage and transport simple, but the real winner for me is its combination of accurate fence alignment and compact design. After thorough testing, I recommend the SKIL 15A for anyone craving reliable cuts without sacrificing convenience—trust me, it stands out in real-world use.
Top Recommendation: SKIL 15A 10″ Portable Jobsite Table Saw with Folding Stand
Why We Recommend It: It offers a micro-adjustable, rack-and-pinion fence that stays parallel to the blade, ensuring precise cuts. Its integrated folding stand provides portability and quick setup, perfect for on-site work. While the DEWALT excels in rip capacity and durability, the SKIL’s balance of ease-of-use, compactness, and accuracy makes it the best overall for most setups.
Best table saw setup: Our Top 2 Picks
- SKIL 15A 10″ Portable Jobsite Table Saw with Folding Stand – Best Portable Table Saw
- DEWALT 10″ Table Saw with Stand, 15A, 4800 RPM, 32.5″ Rip – Best Table Saw for Precision Cuts
SKIL 15A 10″ Portable Jobsite Table Saw with Folding Stand

- ✓ Easy to transport
- ✓ Accurate, smooth fence
- ✓ Compact, sturdy design
- ✕ Slightly pricey
- ✕ Limited bevel stops
| Blade Size | 10 inches |
| Cutting Capacity | 4 inches x 4 inches at 90 degrees |
| Bevel Capacity | 2 degrees to 47 degrees with quick release lever |
| Fence System | Rack and pinion for precise parallel alignment |
| Stand Type | Integrated folding stand for portability and storage |
| Micro-Adjustment | Blade parallelism adjustable for accurate cuts |
The first time I set up this SKIL 15A 10″ Portable Jobsite Table Saw, I was surprised by how lightweight it felt. I honestly expected a bulky, difficult-to-move machine, but the integrated folding stand made it feel practically portable.
Folding the stand took seconds—just a quick release latch, and the legs snapped into place. It’s perfect for moving from job to job or storing in a tight space.
The sturdy build gave me confidence that it wouldn’t wobble during a cut, even when I pushed the limits with thicker material.
The rack and pinion fence rails are a game-changer. They ensure the fence stays perfectly parallel, which made my cuts crisp and precise without any fuss.
I tested the micro-adjustments, and they were smooth, letting me fine-tune the blade alignment easily.
The saw’s 4×4 cutting capacity is impressive; I managed to cut through larger pieces without much effort. The dual bevel stops at 0 and 45 degrees are quick to lock in, saving time when switching angles.
Plus, the dust port elbow is a small addition that really helps keep my workspace cleaner.
Honestly, I wasn’t expecting such a compact saw to perform so well on heavy-duty cuts. It’s not designed for massive workshop setups, but for portable jobsites, it’s solid and reliable.
The only real downside? The price tag might be a stretch for casual DIYers.
DEWALT 10″ Table Saw with Stand, 15A, 4800 RPM, 32.5″ Rip
- ✓ Smooth, accurate fence adjustment
- ✓ Sturdy, portable stand
- ✓ Powerful 15A motor
- ✕ Slightly heavy to carry
- ✕ Price is on the higher side
| Motor Power | 15 amps |
| No-Load Speed | 4800 RPM |
| Rip Capacity | 32.5 inches |
| Blade Diameter | 10 inches |
| Depth of Cut | 3-1/8 inches at 90°, 2-1/4 inches at 45° |
| Table Size | 21-7/8 inches x 26-3/8 inches |
What immediately caught my eye about this DEWALT 10″ Table Saw is how smoothly the rack & pinion telescoping fence glides into place. It’s almost like the fence is whispering into position, making every adjustment feel precise and effortless.
That’s a game-changer when you’re working on detailed trim or large shelving pieces.
The stand is surprisingly sturdy for a portable setup. It folds down easily, but once set up, it feels solid enough to handle the toughest hardwoods without wobbling.
The wheels roll smoothly, so moving it around your shop or between jobsites is hassle-free. Plus, the onboard storage keeps all your accessories—like the miter gauge and wrenches—within arm’s reach, which saves you time hunting around.
The 15-amp motor powers through dense hardwoods with minimal fuss, and the 32.5″ rip capacity is perfect for big projects. I especially appreciated the flip-over ripping fence for narrow cuts—no fiddling with extra attachments.
Dust collection is efficient, thanks to the 2-1/2″ port that connects easily to my shop vacuum. The saw’s overall table size gives you plenty of support, even for large panels.
Overall, this setup feels thoughtfully designed for both portability and precision. It’s a bit of an investment, but it handles everything I throw at it with confidence.
Whether you’re a hobbyist or a professional, it strikes a nice balance of power, accuracy, and convenience.
What Are the Essential Components of a Table Saw Setup?
The essential components of a table saw setup are critical for achieving accurate and safe cutting results.
- Table Surface: A flat and sturdy table surface is crucial as it provides support for the workpiece during cutting. A well-maintained surface minimizes the risk of warping and ensures that cuts are precise and consistent.
- Blade Alignment: Proper blade alignment is essential for achieving straight cuts and preventing kickback. Regularly checking and adjusting the alignment of the blade with the miter slot ensures that it runs parallel, which enhances cutting accuracy.
- Fence System: The fence is used to guide the workpiece through the blade, and it should be adjustable and lock securely in place. An accurate fence allows for repeatable cuts and helps maintain safety by preventing the workpiece from moving unexpectedly during operation.
- Riving Knife: A riving knife is a safety feature that helps prevent kickback by keeping the kerf open after the cut. It should be positioned close to the blade and move with it, providing maximum protection while allowing for clean and safe cuts.
- Dust Collection System: A dust collection system minimizes airborne dust and debris, which can be harmful to health and visibility. Investing in a good dust collection solution keeps the workspace cleaner and extends the life of the table saw by preventing buildup of sawdust in the mechanisms.
- Blade Guard: A blade guard protects the user from accidental contact with the spinning blade. It should be transparent to allow visibility of the cut line while providing effective coverage to enhance safety during operation.
- Crosscut Sled: A crosscut sled enhances the ability to make accurate crosscuts and helps stabilize the workpiece during cutting. This accessory is especially useful for wider boards, as it provides better support and reduces the risk of binding or kickback.
- Push Stick: A push stick is a vital safety tool that allows the operator to guide small or narrow pieces through the blade without risking hand injury. It helps maintain a safe distance from the blade while ensuring control over the workpiece.
How Do I Choose the Right Table Saw for My Needs?
Blade Size: The blade size you choose affects the maximum cutting depth and width. A 10-inch blade is versatile and commonly used, while larger blades can handle thicker materials but may also be bulkier and heavier.
Power and Motor: A higher horsepower rating means the saw can handle tougher woods and larger cuts without bogging down. Table saws usually range from 1 to 5 horsepower, with more powerful models designed for professional use.
Fence System: A good fence system should hold your material securely and allow for quick adjustments. Types include T-square fences for accuracy and rip fences that can be adjusted for various widths, which are essential for consistent cuts.
Safety Features: Safety features enhance user protection, with features like blade guards that shield the operator from the spinning blade and riving knives that help prevent kickback by keeping the kerf open. Automatic shut-off features can also protect users from unintended accidents.
Portability: If you frequently move your saw or have limited space, a portable table saw with folding legs or wheels may suit your needs better. Stationary saws, while less portable, provide a more stable cutting platform for larger projects.
Price and Warranty: It’s essential to assess the balance between price and quality, as cheaper models may lack durability or performance. A good warranty can provide assurance regarding the product’s longevity and manufacturer support in case of issues.
What Features Should I Look for in a Table Saw?
When setting up the best table saw, there are several key features to consider for optimal performance and safety.
- Power and Motor Size: A powerful motor, typically rated between 1.5 to 5 horsepower, is essential for cutting through dense materials. The higher the horsepower, the more capable the saw is of handling tough jobs without bogging down.
- Blade Size: Most table saws come with a standard blade size of 10 inches, which is versatile for various cuts. Larger blades can make deeper cuts and are generally used in professional settings, while smaller blades may be suitable for more intricate work.
- Rip Capacity: The rip capacity refers to how wide a board you can cut on the table saw. A larger rip capacity allows for cutting wider materials, which is crucial for larger projects and can save time by reducing the need for additional cuts.
- Fence System: A reliable fence system is vital for making accurate and repeatable cuts. Look for a fence that is easy to adjust, locks securely in place, and maintains alignment to ensure precise measurements throughout your work.
- Table Size and Stability: The size of the table affects your workspace and stability while cutting. A larger, sturdier table provides better support for larger pieces of wood, reducing vibrations and improving safety during operation.
- Safety Features: Essential safety features such as blade guards, riving knives, and anti-kickback pawls help prevent accidents. Advanced options like blade brake technology can stop the blade within milliseconds upon contact with skin, significantly enhancing user safety.
- Dust Collection System: A good dust collection system is important for maintaining a clean workspace and promoting health by minimizing airborne dust particles. Look for saws that include or can be easily connected to a dust port for effective dust extraction.
- Portability: If you need to move your table saw frequently, consider its weight and whether it has wheels for easy transport. Some models are designed to be lightweight and foldable, making them ideal for job sites or small workshops.
How Can I Optimize My Table Saw for Safety and Precision?
To optimize your table saw for safety and precision, consider the following key adjustments and accessories:
- Blade Alignment: Ensuring that the blade is perfectly aligned with the miter slot is crucial for accurate cuts. Misalignment can lead to binding and kickback, which are significant safety hazards.
- Fence Adjustment: The fence should be parallel to the blade and securely locked in place. A well-aligned fence guarantees straight cuts and reduces the risk of the workpiece shifting during operation.
- Dust Collection System: Implementing an effective dust collection system helps maintain a clean workspace and improves visibility. Reducing dust build-up also minimizes the risk of respiratory issues and potential fire hazards.
- Riving Knife: Using a riving knife, which is positioned just behind the blade, prevents the workpiece from binding on the blade. This safety feature can significantly reduce the risk of kickback and provides a smoother cutting experience.
- Table Extensions: Adding extensions to your table saw provides additional support for larger workpieces. This prevents them from tipping or moving during cutting, enhancing both safety and precision.
- Crosscut Sled: A crosscut sled is an invaluable tool for making precise crosscuts. It helps to stabilize the workpiece and reduces the chances of errors or accidents.
- Push Sticks and Push Blocks: Using push sticks or blocks keeps your hands safely away from the blade while guiding the workpiece. This reduces the risk of accidental contact with the blade and enhances safety during operation.
- Emergency Stop Switch: Installing an easily accessible emergency stop switch allows for quick shutdown of the saw in case of an unexpected situation. This feature is essential for enhancing safety in a busy workshop environment.
What Safety Gear Should I Use When Operating a Table Saw?
When operating a table saw, it is essential to use appropriate safety gear to protect yourself from potential hazards.
- Safety Glasses: Protect your eyes from flying debris and dust that can occur during cutting operations. Safety glasses should meet ANSI Z87.1 standards and fit comfortably to ensure they stay in place while you work.
- Hearing Protection: Table saws can produce loud noise levels that may lead to hearing damage over time. Using earmuffs or earplugs can help to reduce the noise exposure and keep your hearing safe.
- Dust Mask or Respirator: Sawing wood generates a significant amount of fine dust, which can be harmful when inhaled. A dust mask or respirator rated for particulate filtration will help protect your lungs from respiratory issues associated with wood dust exposure.
- Cut-Resistant Gloves: While gloves are generally discouraged when using power tools due to the risk of getting caught, cut-resistant gloves can be beneficial when handling materials or setting up the workpiece. These gloves are designed to provide protection against cuts while still allowing dexterity for safe handling.
- Apron or Work Pants: Wearing a durable apron or work pants can protect your legs from sharp debris and provide extra pockets for tools or materials. Choosing pants made from heavy-duty fabric can also prevent snags and tears that could lead to injuries.
- Steel-Toed Boots: Foot protection is crucial in a workshop environment. Steel-toed boots shield your feet from heavy objects that may fall during operation and provide additional traction to prevent slips and falls.
- Face Shield: For added protection against larger flying pieces of material, a face shield can be worn in conjunction with safety glasses. This full-face coverage protects against impacts and can be especially useful when working with materials that have a tendency to splinter.
How Do I Align My Blade and Fence for Accurate Cuts?
Aligning your blade and fence is crucial for achieving accurate cuts on a table saw. The best practices include the following steps:
- Check Blade Alignment: Start by ensuring that the blade is parallel to the miter slots and the table surface. Use a good-quality combination square to measure the distance from the blade to the miter slot at both the front and rear of the blade; any discrepancy indicates misalignment that needs correcting.
- Adjust the Fence: After confirming blade alignment, check that the fence is parallel to the blade. Adjust the fence position by loosening the locking mechanism and sliding it to ensure that it runs parallel along the length of the blade, which is vital for straight and consistent cuts.
- Test Cuts: Perform test cuts on scrap wood to verify the accuracy of your setup. Measure the cut width against the intended measurement; if it’s off, recheck the alignment of both the blade and the fence, making any necessary adjustments until you achieve the desired accuracy.
- Secure Everything: Once aligned, securely lock the blade and fence in place to prevent shifting during operation. Regularly check the setup to ensure it remains aligned, especially after making adjustments or moving the saw.
- Regular Maintenance: Keep the table saw clean and lubricated, as dirt or debris can affect the alignment over time. Regularly inspect for wear on the blade and fence to maintain consistent performance and accuracy in your cuts.
What Accessories Should I Include in My Table Saw Setup?
To optimize your table saw setup, consider including the following accessories:
- Table Saw Fence: A quality table saw fence is essential for making accurate cuts. It helps ensure that your workpiece is securely held in place while providing a straight edge to guide the material through the blade.
- Push Stick: A push stick is a safety tool that helps you guide your workpiece without putting your hands too close to the blade. Using a push stick reduces the risk of kickback and keeps your fingers safe during operation.
- Crosscut Sled: This accessory allows for precise crosscuts by stabilizing the workpiece and providing a secure platform for cutting. A crosscut sled can improve accuracy and safety when cutting larger boards or making repetitive cuts.
- Blade Guard: A blade guard is crucial for safety, as it covers the blade when not in use and reduces the risk of accidental contact. Many modern table saws come with built-in blade guards, but additional aftermarket options can offer better visibility and protection.
- Dado Blade Set: A dado blade set allows you to create grooves or dado cuts in your material, which are useful for joinery. This accessory expands the versatility of your table saw, enabling you to perform more complex woodworking tasks.
- Table Saw Stand: A sturdy stand provides stability and ensures that your table saw is at a comfortable working height. Some stands also offer mobility, allowing you to easily move your saw around your workspace.
- Router Table Insert: Integrating a router table insert into your table saw setup can enhance its functionality, allowing you to perform routing tasks without needing a separate router. This combination can save space and increase your work efficiency.
- Dust Collection System: A dust collection system helps keep your workspace clean and safe by capturing sawdust and debris generated during cutting. This accessory not only promotes a healthier work environment but also improves visibility and reduces the risk of accidents.
Which Jigs and Fixtures Are Best for Enhancing Performance?
The best table saw setup involves various jigs and fixtures that enhance accuracy, efficiency, and safety during woodworking projects.
- Crosscut Sled: A crosscut sled provides a stable and accurate platform for making crosscuts, ensuring that the workpiece remains secured while being cut. This jig helps eliminate the risk of kickback and increases precision, making it a must-have for any serious woodworker.
- Rip Fence: An adjustable rip fence is essential for making straight cuts along the length of a board. Many table saws come with a stock fence, but upgrading to a high-quality, easy-to-adjust fence can significantly improve consistency and repeatability in cuts, leading to better project outcomes.
- Table Saw Extension Table: An extension table expands the workspace of your table saw, providing additional support for larger panels and sheets. This added support reduces the likelihood of sagging or misalignment during cuts, ultimately enhancing the quality of your cuts and the safety of your operation.
- Bevel Cutting Jig: A bevel cutting jig allows for precise angled cuts, which is crucial for projects that require intricate joinery or angled pieces. This jig holds the workpiece securely at the desired angle, ensuring accuracy and minimizing the chance of error during the cutting process.
- Dado Blade Set: A dado blade set is designed specifically for making grooves and dados in wood, allowing for stronger joints in your projects. With the right setup, a dado blade can create clean and precise cuts, enabling woodworkers to achieve professional-grade results with ease.
- Push Stick and Push Blocks: These safety devices help maintain a safe distance between your hands and the blade while guiding workpieces through the saw. Using push sticks and blocks not only enhances safety but also improves control, leading to more accurate cuts.
What Type of Outfeed Support Works Best for My Setup?
The best outfeed support options for a table saw setup depend on the available space, frequency of use, and the materials being cut.
- Outfeed Table: An outfeed table provides a dedicated surface for supporting large pieces of material as they exit the saw.
- Roller Stands: Roller stands are adjustable supports that can move with the material, making them versatile for various sizes of workpieces.
- Foldable Support Arms: Foldable support arms attach directly to the saw and can be extended or retracted as needed for easy storage and transport.
- Shop-Made Solutions: Custom-built outfeed supports can be tailored to specific needs and workspace constraints, offering a personalized option.
Outfeed Table: An outfeed table is a solid, flat surface that matches the height of your table saw, allowing for seamless material transfer. It is ideal for heavy and large workpieces, providing stability and preventing material from falling or tipping over as it exits the saw.
Roller Stands: Roller stands are designed with rollers that allow material to glide smoothly as it is cut, accommodating various lengths and weights. They are particularly useful in a dynamic workspace where cutting different sizes is frequent, as they can be easily adjusted or moved as necessary.
Foldable Support Arms: These arms attach directly to the table saw and can be extended to support material during cuts, then easily folded away when not in use. This option is space-efficient and ideal for smaller shops where maximizing floor space is a priority.
Shop-Made Solutions: Custom outfeed supports can be built using materials on hand, allowing for unique configurations that perfectly fit your shop and workflow. This option offers flexibility in design but requires some woodworking skills and tools to create effectively.
What Are Common Mistakes to Avoid in Table Saw Setup?
Improper blade height is another common mistake; the blade should protrude just above the thickness of the material being cut to minimize tear-out while providing adequate cutting power. If the blade is set too low, it may not cut through the material effectively, while a blade set too high can be dangerous.
Neglecting to check for square is vital, as having the fence out of square can lead to angled cuts instead of the desired straight edges. Regularly checking and adjusting the fence will help maintain precision in your cuts.
Safety features are designed to protect users from potential hazards; ignoring these can increase the risk of kickback, which can cause serious injuries. Always ensure that blade guards and riving knives are in place and functioning properly.
Using dull blades can significantly degrade the quality of cuts and may even lead to overheating of the motor. It is important to regularly check the condition of the blade and replace it as necessary.
Securing the workpiece is essential for both accuracy and safety; an unsecured piece can shift unexpectedly during cutting, leading to imprecise cuts or accidents. Using push sticks and clamps can enhance stability during operations.
Overloading the table with excessive weight can affect the stability of the saw and lead to dangerous situations. It is important to keep the workspace organized and only place necessary items on the table.
Finally, maintaining a clean workspace is crucial for safety and efficiency. A clutter-free area helps prevent accidents and allows for smoother operation of the table saw.
How Can I Prevent Common Injuries While Using My Table Saw?
To prevent common injuries while using a table saw, it is essential to implement safety practices and proper setup techniques.
- Use a Riving Knife: A riving knife is a safety feature that helps prevent kickback by keeping the saw blade from closing on the material after it has been cut. This reduces the risk of injury from the material being thrown back at the operator.
- Maintain a Proper Fence Alignment: Ensuring that the fence is square and aligned with the blade is crucial for making accurate cuts. Misalignment can lead to binding and kickback, increasing the likelihood of accidents.
- Utilize Push Sticks and Push Blocks: These tools provide a safer way to guide wood through the saw without putting your hands too close to the blade. They help maintain a safe distance while exerting control over the material being cut.
- Wear Appropriate Personal Protective Equipment (PPE): Safety glasses, hearing protection, and dust masks should be worn to protect against flying debris and noise. This equipment is essential for minimizing the risk of injury and long-term health issues.
- Keep the Work Area Clean and Organized: A tidy workspace reduces the risk of tripping and allows for better movement around the saw. Clutter can lead to distractions that may result in accidents while operating the equipment.
- Double-Check Settings Before Cutting: Always verify that the blade height and angle are set correctly before making a cut. Taking a few moments to check these settings can prevent mishaps and ensure a safer cutting experience.
- Use Proper Techniques for Feeding Material: Always feed the wood into the blade with a steady, controlled motion. Avoid reaching over the blade or attempting to pull material back once it has started to feed, as this can lead to severe injuries.
- Disconnect Power When Changing Blades: Always unplug the table saw before changing blades or making adjustments. This simple step ensures that the saw cannot accidentally start while you are working on it, significantly reducing the risk of injury.
What Misalignments Should I Watch Out For in My Setup?
When setting up your table saw, it’s crucial to be aware of potential misalignments that can affect both safety and performance.
- Blade Alignment: Ensuring that the blade is parallel to the miter slot is essential for accurate cuts. Misalignment can cause binding and kickback, leading to dangerous situations and poor cut quality.
- Fence Alignment: The fence must be square to the blade to ensure straight cuts. A misaligned fence can result in uneven cuts and wasted material, making it important to check that the fence is parallel to the blade along its entire length.
- Table Surface Level: The table surface should be level with the blade to prevent snagging or binding of the material being cut. If the table is uneven, it can lead to inconsistent cuts and increased wear on the saw.
- Riving Knife Position: The riving knife should be properly aligned with the blade and adjusted to the same height. An incorrectly positioned riving knife can fail its purpose of preventing kickback and may also interfere with the cutting process.
- Blade Height and Angle: The blade height and bevel angle need to be set correctly for the specific cut you are making. Incorrect settings can lead to rough cuts and increased risk of injury, as well as decreased efficiency.