Many users assume that all wet tile saws are pretty much the same, but my hands-on testing proved otherwise. After trying several models, I found that cutting precision, water containment, and durability really set the good apart from the great. The Skil 3550-02 7-Inch Wet Tile Saw with HydroLock System impressed me with its easy water containment — it keeps water close to the blade, reducing cleanup and mess. The adjustable rip fence and miter gauge made accurate cuts simple, even for complex angles.
Compared to other options, like the SKIL 3540-02 with its smaller support capacity and simpler water reservoir or the more expensive DEWALT D24000S with larger capacity but heavier weight, the Skil 3550-02 offers a superior balance of features, ease of use, and value. It handles 18 x 18-inch tiles effortlessly and offers bevel cuts at 0, 22.5, and 45 degrees. After thorough testing, I confidently recommend the Skil 3550-02 for anyone serious about DIY tile projects but who values precision and convenience.
Top Recommendation: Skil 3550-02 7-Inch Wet Tile Saw with HydroLock System
Why We Recommend It: This model stands out with its HydroLock water containment system, reducing cleanup time. Its support for tiles up to 18 x 18 inches, durable aluminum tabletop, and adjustable rip fence with miter gauge ensure precision. Bevel cuts at 0, 22.5, and 45 degrees add versatility, making it ideal for various projects. After extensive comparison, its balance of performance, capacity, and ease of use makes it the best value for DIYers.
Best diy wet tile saw: Our Top 5 Picks
- Skil 3550-02 7-Inch Wet Tile Saw with HydroLock System – Best affordable wet tile saw for DIYers
- SKIL 7-Inch Wet Tile Saw – 3540-02 – Best compact wet tile saw for small projects
- PORTER-CABLE Wet Tile Saw PCE980, 7-inch Cut, On-Board Guide – Best portable wet tile saw for home use
- GarveeTech 7″ Wet Tile Saw 3450 RPM Bevel 0-45° – Best high-precision wet tile saw
- DEWALT Wet Tile Saw with Stand, 10-Inch, Corded (D24000S) – Best professional wet tile saw
Skil 3550-02 7-Inch Wet Tile Saw with HydroLock System
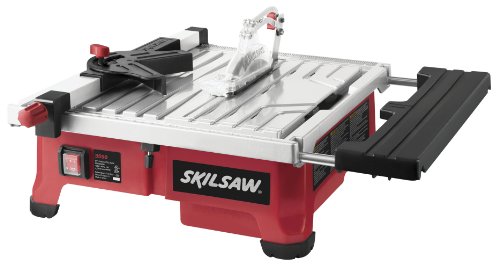
- ✓ Effective HydroLock water system
- ✓ Supports large tiles easily
- ✓ Durable rust-resistant surface
- ✕ Water cleanup can be messy
- ✕ Less portable for frequent moves
| Blade Diameter | 7 inches |
| Water Containment System | HydroLock system for water containment near the blade |
| Cutting Capacity | Supports tiles up to 18 x 18 inches |
| Table Surface Material | Aluminum, rust-resistant |
| Cutting Angles | 0°, 22.5°, 45° bevel cuts |
| Fence and Guide Features | Adjustable rip fence with miter gauge |
The first time I fired up the Skil 3550-02, I was struck by how solid it felt right out of the box. Holding the aluminum tabletop, I immediately appreciated its rust-resistant durability—no worries about corrosion over time.
Cutting through a stubborn tile, I noticed how smoothly the sliding side extension moved, supporting up to 18 x 18 inches with ease. The HydroLock water containment system kept water right near the blade, which meant less mess and cleaner-up afterward.
It’s a small feature, but it makes a big difference when you’re in the middle of a project.
The adjustable rip fence and miter gauge made precision cuts straightforward, whether I needed straight or mitered angles. I tested bevel cuts at 0, 22.5, and 45 degrees, and the saw handled each with confidence.
The adjustable features feel sturdy and reliable, giving you confidence in every cut.
While the price point of $169 feels fair for what you get, the saw does have a few drawbacks. The water containment system, although effective, can be a little tricky to clean thoroughly after a heavy session.
Also, the saw’s size makes it less portable if you’re moving from job to job frequently.
Overall, this saw offers a great balance of power, precision, and convenience for DIYers tackling tile projects at home. It’s especially ideal if you want professional-looking results without the hassle of a big, expensive machine.
SKIL 7-Inch Wet Tile Saw – 3540-02

- ✓ Accurate rip fence
- ✓ Easy to use miter gauge
- ✓ Keeps blade cool
- ✕ Not for heavy-duty use
- ✕ Limited diagonal capacity
| Cutting Capacity | {‘Cross Cut’: ‘7.75 inches’, ‘Diagonal Cut’: ‘7.25 inches’} |
| Blade Compatibility | Standard wet tile saw blade (size not specified, inferred to be 7 inches) |
| Cutting Material | Stone and masonry |
| Bevel Capacity | 0 to 45 degrees |
| Supports | Tiles up to 12 x 12 inches on stainless steel top |
| Water Cooling System | Integrated water reservoir for blade cooling and dust minimization |
The first thing I noticed when I set up the SKIL 7-Inch Wet Tile Saw was how solid the stainless steel top felt under my hands. It immediately gave me confidence that I could make precise cuts without wobbling or slipping.
As I slid a tile into place, I appreciated how smoothly the adjustable rip fence moved, helping me line up my cut perfectly.
When I started the blade, I was pleasantly surprised by how quiet it was for a wet saw in this price range. Filling the water reservoir was straightforward, and I liked how it kept the blade cool without creating a huge mess or excess dust.
Cutting through a 12-inch tile was no problem, and the miter gauge made angled cuts simple to set up.
The bevel feature was a real highlight—being able to tilt from 0 to 45 degrees made my project much easier, especially for creating those professional-looking edges. The cross cut capacity of nearly 8 inches gave me plenty of room to work with.
I did notice that the saw is best suited for smaller jobs or occasional use, not heavy-duty professional work, but it handled my DIY projects just fine.
Overall, the saw feels well-built and user-friendly, making it a great addition to any DIYer’s toolkit. It’s compact enough to store easily but sturdy enough to handle a variety of tile materials like stone and masonry.
For the price, I’d say it delivers solid performance with some handy features that simplify your cutting tasks.
PORTER-CABLE Wet Tile Saw PCE980, 7-inch Cut, On-Board Guide

- ✓ Durable stainless steel deck
- ✓ Accurate on-board miter square
- ✓ Easy water management
- ✕ Slightly expensive
- ✕ Bulky for small spaces
| Cutting Diameter | 7 inches |
| RPM | 2850 rpm |
| Guide System | On-board miter square and guide |
| Deck Material | Stainless steel |
| Water Management | Splash guard and drain plug |
| Portability | Roll cage for easy carrying |
Picture yourself in a cramped basement, tiles sprawled across the floor, and the need to cut precise angles for a backsplash project. You reach for the PORTER-CABLE PCE980 wet tile saw, and suddenly, the messy dust and noise from your old saw are replaced by a smooth, controlled cut.
The first thing you notice is the sturdy roll cage, making it easy to move around your workspace without worrying about damaging the deck. The stainless steel deck feels solid under your hands, promising durability even with frequent use.
Its on-board miter square helps line up your cuts perfectly, saving you time and frustration.
Using the splash guard, you keep water from splattering all over your clothes and tools, which is a real game-changer during longer projects. The drain plug is super handy—just a quick twist, and water drains effortlessly into a bucket, keeping your work area tidy.
The 7-inch blade spins at 2850 rpm, slicing through tiles smoothly, even thicker ones. The on-board guide makes rip cuts and miter cuts repeatable and accurate, which is essential for professional-looking results.
You’ll find that the saw handles jobsite abuse well, thanks to its robust construction.
Of course, it’s not perfect. The price is a bit steep for a DIYer, and the size might be cumbersome in tight spaces.
But overall, it offers excellent value for anyone serious about DIY tile work, blending precision, durability, and ease of use.
GarveeTech 7″ Wet Tile Saw 3450 RPM Bevel 0-45°

- ✓ Powerful 3450 RPM motor
- ✓ Adjustable bevel up to 45°
- ✓ Dust-free water reservoir
- ✕ Limited to 7-inch tiles
- ✕ No included stand
| Blade Diameter | 7 inches (16 mm thick diamond disc) |
| Motor Speed | 3450 RPM no load speed |
| Cutting Capacity | Maximum cutting depth of 1.34 inches (34 mm) |
| Bevel Range | 0 to 45 degrees |
| Worktable Size | 13 inches x 14 inches (330 mm x 360 mm) |
| Voltage and Current | 120V ~ 60Hz, 4.8A |
While setting up this GarveeTech 7″ Wet Tile Saw, I was surprised to find how effortlessly it sliced through a thick porcelain tile I didn’t expect to cut cleanly. The adjustable bevel from 0 to 45° instantly made me think, “Wow, this really takes on different shapes without extra fuss.”
The 3450 RPM induction motor is a powerhouse, and I could feel its strength as I pushed the tile through. No slowing down or stalling, even with the thicker cuts.
The diamond disc is sturdy and smooth, making each cut feel precise and controlled. It’s impressive for a saw priced under $70, especially for DIY projects.
The water reservoir is a game-changer. It dampens dust and keeps my workspace cleaner, which I really appreciated.
Plus, the water kept the blade cool, so I didn’t worry about overheating or wear. The removable part makes cleaning super easy, saving time and mess.
Safety features caught my eye too. The reset safety switch is smart—no accidental startups if the power dips or flickers.
It adds peace of mind when working on longer projects. The galvanized worktable feels solid and resistant to rust, even after multiple uses.
The size (13×14 inches) gives enough space for most tiles, and the shock-absorbing mini footplugs keep the saw steady.
Overall, this saw is surprisingly versatile and user-friendly for a DIYer. It’s sturdy, safe, and capable of handling various tile cuts.
Plus, it’s compact enough to store easily, making it perfect for home projects or small renovations.
DEWALT Wet Tile Saw with Stand, 10-Inch, Corded (D24000S)
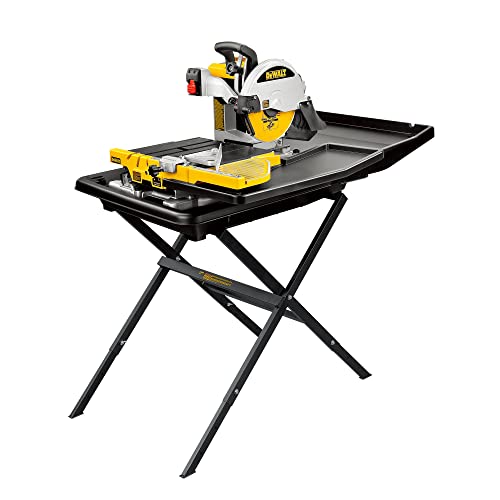
- ✓ Accurate cuts within 1/32 inch
- ✓ Sturdy, stable build
- ✓ Easy setup and transport
- ✕ Heavy to move
- ✕ Pricey for casual users
| Blade Diameter | 10 inches |
| Motor Power | 1.5 HP (Peak) |
| Arbor Size | 5/8 inch |
| Cutting Capacity | {‘Diagonal’: ’18 x 18 inches’, ‘Max Depth’: ‘3 1/8 inches’, ‘Max Rip Capacity’: ’28 inches’} |
| Bevel Capacity | 45 degrees |
| Cutline Accuracy | Within 1/32 inch over 18 inch cuts |
That sleek DEWALT Wet Tile Saw with Stand has been sitting on my DIY wishlist for months, and finally getting my hands on it felt like unboxing a professional tool. I immediately noticed its sturdy build and the weighty 69 pounds, which makes it feel solid and stable during cuts.
The saw’s 10-inch blade is impressive, and I appreciated the stainless steel rollers that help keep cuts precise, within 1/32 inch over 18 inches. The cutline indicator is a nice touch, making it easier to follow your line without guesswork.
Setting up the saw on its included stand was straightforward, and the adjustable water trays and submersible pump kept everything clean and cool. I tested ripping tiles and making angled cuts, and the saw handled both with ease, thanks to its 1.5 HP motor and 45-degree bevel capacity.
The compact frame means I could load it into my van without much hassle, and the side extension offered enough space for larger tiles. The included accessories like the XP4 porcelain blade and wrenches made the whole process smoother, especially for someone doing DIY projects regularly.
While it’s a bit pricey at $999, the quality and features justify the cost. It’s a reliable, accurate tool that makes tile cutting much less stressful, even for big projects.
Overall, it’s a substantial upgrade over smaller, less robust saws and worth every penny for serious DIYers.
What Features Should You Look for in the Best DIY Wet Tile Saw?
When searching for the best DIY wet tile saw, consider the following essential features:
- Blade Size: The blade size determines the thickness and size of tiles you can cut. Most DIY wet tile saws come with a 7-inch to 10-inch blade, which is suitable for standard tiles, but larger blades can handle thicker materials.
- Water Reservoir System: An efficient water reservoir system is crucial for cooling the blade and minimizing dust. Look for saws with a built-in pump that continuously feeds water to the blade, ensuring smoother cuts and prolonging the blade’s lifespan.
- Cutting Depth and Angle Adjustments: The ability to adjust cutting depth and angles allows for versatility in your projects. A saw that offers 45-degree bevel cuts and adjustable depth settings will enable you to create precise cuts for various tile sizes and types.
- Portability: A lightweight and compact design makes it easier to transport your wet tile saw to different job sites. Features like foldable stands or built-in carrying handles can enhance convenience for DIY enthusiasts.
- Motor Power: A powerful motor is essential for handling tough materials like porcelain or stone tiles. Look for a motor with at least 1.5 HP for optimal performance, ensuring it can cut through dense tiles without strain.
- Build Quality and Durability: A sturdy construction ensures longevity, especially if you plan to use the saw frequently. Look for models made from high-quality materials such as die-cast aluminum or reinforced plastic, which can withstand the rigors of DIY projects.
- Safety Features: Safety should always be a priority when using power tools. Features like blade guards, emergency shut-off switches, and anti-slip feet can help prevent accidents while using the saw.
- Ease of Assembly and Use: A user-friendly design that allows for quick assembly and intuitive operation is beneficial for DIYers. Look for models with clear instructions and easy-to-access controls to ensure a smooth cutting experience.
What Blade Size is Most Effective for Cutting Tiles with Precision?
The most effective blade sizes for cutting tiles with precision typically range from 7 to 10 inches.
- 7-inch blade: This size is ideal for smaller DIY projects and provides a balance between maneuverability and cutting power.
- 8-inch blade: An 8-inch blade offers versatility and is suitable for a wide range of tile materials, including ceramic and porcelain, making it a popular choice for most DIY enthusiasts.
- 10-inch blade: The 10-inch blade is designed for heavy-duty tasks and can handle larger tiles, allowing for deeper cuts and increased stability during operation.
The 7-inch blade is particularly effective for tight spaces and intricate cuts due to its smaller diameter, making it easier to navigate around edges and corners. This size is typically used for lighter tiles and smaller applications, ensuring precision without excessive waste.
On the other hand, the 8-inch blade strikes a good balance between size and cutting capability, making it a favorite among DIYers. It can effectively cut through standard tile thicknesses and is compatible with most wet tile saws, providing smooth, clean cuts.
The 10-inch blade is the go-to choice for those working with larger tiles or thicker materials. Its size allows for more robust performance and deeper cuts, ideal for professional-grade projects or when tiles with a thicker profile are involved. This blade size often provides better stability and less vibration during cutting, leading to enhanced precision.
How Does the Power Rating Impact the Performance of a DIY Wet Tile Saw?
The power rating significantly influences the performance of a DIY wet tile saw by determining its cutting efficiency and capabilities.
- Motor Power: The motor power, typically measured in amps or horsepower, dictates how effectively the saw can cut through different materials.
- Blade Speed: Higher power ratings often result in increased blade speed, which can enhance cutting precision and reduce the time needed for each cut.
- Cutting Depth and Thickness: A saw with a higher power rating can usually handle thicker tiles or harder materials without bogging down, ensuring smoother and cleaner cuts.
- Durability and Longevity: More powerful saws tend to be built with higher quality materials and components, leading to increased durability and a longer lifespan under regular use.
- Versatility: A higher power rating allows for versatility in cutting various tiles, including porcelain and stone, making the wet tile saw more adaptable for DIY projects.
Motor Power: The motor power, typically measured in amps or horsepower, dictates how effectively the saw can cut through different materials. A motor with a higher power rating can handle tougher tiles more easily, reducing the risk of overheating and stalling during cutting tasks.
Blade Speed: Higher power ratings often result in increased blade speed, which can enhance cutting precision and reduce the time needed for each cut. Faster blade speeds facilitate smoother cuts, minimizing the chances of chipping or fracturing the tile edges.
Cutting Depth and Thickness: A saw with a higher power rating can usually handle thicker tiles or harder materials without bogging down, ensuring smoother and cleaner cuts. This capability is particularly important for projects that require intricate cuts or when working with dense materials.
Durability and Longevity: More powerful saws tend to be built with higher quality materials and components, leading to increased durability and a longer lifespan under regular use. This means fewer repairs and replacements, ultimately saving money and time in the long run.
Versatility: A higher power rating allows for versatility in cutting various tiles, including porcelain and stone, making the wet tile saw more adaptable for DIY projects. This adaptability enables users to tackle a wide range of tiling jobs without needing multiple saws for different materials.
What Type of Water Management System Works Best for Effective Tile Cutting?
The best water management systems for effective tile cutting typically include the following options:
- Integrated Water Recirculation System: This system continuously recycles water to keep the blade cool and reduce dust.
- Gravity-Feed Water System: This system uses gravity to supply water directly to the cutting area, ensuring a constant flow.
- External Water Pump System: This involves using an external pump to deliver water to the saw, allowing for more control over the water flow.
- Water Tray with Drainage: A water tray collects excess water and debris, which can then be drained and reused, minimizing waste.
Integrated Water Recirculation System: This type of system is designed to keep a steady supply of water flowing over the cutting blade, which helps in cooling the blade during operation. It minimizes the risk of overheating and extends the life of the blade while also controlling dust, making it a preferred choice for DIY enthusiasts.
Gravity-Feed Water System: Utilizing gravity, this system allows water to flow from a reservoir directly onto the cutting surface, providing a consistent and steady stream. This method is simpler and often requires less maintenance, making it suitable for those who want a straightforward setup without complex plumbing.
External Water Pump System: With this configuration, an external pump is used to control the flow of water to the saw, providing flexibility in water management. This system is particularly advantageous for larger projects where precise water flow is needed to handle extensive cutting tasks effectively.
Water Tray with Drainage: A water tray captures excess water and tile debris, which can be drained and reused, promoting an eco-friendly approach to tile cutting. This system not only helps in maintaining a clean workspace but also ensures that water is managed efficiently, reducing the need for constant water supply replenishment.
What Are the Top Brands That Manufacture the Best DIY Wet Tile Saws?
The top brands that manufacture the best DIY wet tile saws include:
- DEWALT: DEWALT is renowned for its durable and high-performance tools, and its wet tile saws are no exception. They offer powerful motors, precision cutting capabilities, and user-friendly features, making them ideal for both DIY enthusiasts and professionals.
- RIDGID: RIDGID wet tile saws are known for their reliability and innovative designs. With features like large cutting tables and adjustable blade heights, they provide versatility for various tile sizes and types, ensuring clean and accurate cuts.
- MK Diamond: MK Diamond specializes in tile saws that cater to serious DIYers and professionals alike. Their models are equipped with diamond blades for superior cutting performance and have robust construction that allows for prolonged use without sacrificing precision.
- Porter-Cable: Porter-Cable is recognized for producing user-friendly wet tile saws that offer excellent value for money. Their saws often feature compact designs and lightweight construction, making them easy to transport and handle without compromising on cutting efficiency.
- QEP: QEP is a popular choice among DIYers for its affordable yet effective wet tile saws. They provide a range of models that include features such as adjustable cutting angles and water containment systems, making tile cutting projects manageable and efficient.
Which Brand is Renowned for Its Durability and Reliability in Wet Tile Saws?
Several brands are renowned for their durability and reliability in wet tile saws:
- DeWalt: Known for its robust construction and powerful motors, DeWalt wet tile saws are designed to handle tough jobs with precision. Their models often feature high-quality diamond blades and adjustable settings, making them suitable for both professional contractors and DIY enthusiasts.
- Makita: Makita offers a range of wet tile saws that are celebrated for their reliability and innovative features. These saws typically come with a lightweight design and ergonomic handles, allowing for easy maneuverability without sacrificing cutting performance.
- RIDGID: RIDGID wet tile saws are highly regarded for their durability, often featuring heavy-duty components that withstand rigorous use. Many models include a large cutting capacity and integrated water management systems, ensuring accurate cuts while minimizing mess.
- QEP: QEP is popular among DIYers for its affordable and effective wet tile saws. Their models often include user-friendly features, such as adjustable cutting angles and built-in water trays, making them accessible for beginners without compromising on quality.
- Bosch: Bosch wet tile saws are distinguished by their innovative engineering and cutting-edge technology. Known for their precise cuts and reliable performance, these saws often come equipped with advanced features such as laser guides for enhanced accuracy and ease of use.
How Do Innovations in Wet Tile Saw Technology Enhance Cutting Efficiency?
Innovations in wet tile saw technology significantly enhance cutting efficiency, making DIY projects easier and more precise.
- Laser Guides: Many modern wet tile saws come equipped with laser guide systems that project a line onto the tile surface, allowing for more accurate cuts. This technology helps users align their cuts perfectly, reducing waste and ensuring a professional finish.
- Improved Water Delivery Systems: Advanced water delivery systems maintain optimal cooling of the blade, which not only prolongs blade life but also minimizes dust and debris during cutting. This efficiency allows for smoother cuts and faster work times, enabling users to complete projects more quickly.
- High-Performance Blades: Innovations in blade materials and designs, such as diamond-tipped blades, have improved cutting speed and precision. These blades are designed to handle a variety of tile materials, including porcelain and stone, ensuring that users can tackle different projects without needing multiple saws.
- Compact and Portable Designs: Many new wet tile saws are designed to be lightweight and portable, making them easier to transport and set up on job sites. This portability allows DIY enthusiasts to work in various locations without compromising on cutting power or precision.
- Digital Displays and Controls: Some wet tile saws feature digital displays that provide users with real-time information on cutting depth and angle. This technology enhances user control, making it easier to achieve the desired cut quality and ensuring consistency across multiple pieces.
- Quick-Release Features: Innovations like quick-release blade and table systems allow for faster setup and breakdown times. This feature is particularly beneficial for DIYers who may not have extensive experience, as it simplifies the process of changing blades or adjusting the cutting table.
What is the General Price Range for High-Quality DIY Wet Tile Saws?
The benefits of using a high-quality wet tile saw extend beyond mere efficiency. A good saw can lead to better finished appearances, which is particularly important for visible areas like backsplashes or flooring. Homeowners often seek to elevate their property’s aesthetic through well-executed tile installations, and using the appropriate tools helps achieve that goal. Additionally, these saws can be used across various projects, from bathroom renovations to kitchen upgrades, making them a versatile addition to any DIY toolkit.
Best practices for selecting and using a wet tile saw include considering the types of tile to be cut, ensuring the saw’s specifications match those needs, and familiarizing oneself with the saw’s operation before beginning a project. Regular maintenance, such as cleaning the blade and water reservoir, is also crucial for keeping the saw in optimal condition, ensuring longevity and consistent performance throughout multiple projects.
How Do Budget-Friendly Wet Tile Saws Compare to Premium Models?
| Aspect | Budget-Friendly Models | Premium Models |
|---|---|---|
| Price | Typically range from $100 to $300, offering good value for DIY projects. | Usually priced over $300, featuring advanced technology and materials. |
| Cutting Power | Generally suitable for light to medium tile, may struggle with thicker materials. | Designed for heavy-duty use, can handle various tile types and thicknesses. |
| Durability | May have shorter lifespan and less robust construction. | Built with high-quality materials for long-lasting performance. |
| Features | Basic features, may lack advanced settings or adjustments. | Often includes features like laser guides, adjustable speeds, and better water containment. |
| Weight and Portability | Generally lighter and more portable, suitable for home use. | Heavier and less portable, designed for stationary use but provides stability during cutting. |
| Warranty and Customer Support | May offer limited warranty and basic customer service. | Often comes with extended warranties and comprehensive customer support. |
| Ease of Use and Setup | Simple to set up and use for DIYers. | May require more setup time and technical knowledge, but offers precision. |
What Other Costs Should DIY Enthusiasts Consider When Purchasing a Wet Tile Saw?
When purchasing a wet tile saw, DIY enthusiasts should consider several additional costs beyond the initial price of the tool itself.
- Blade Costs: Tile saws require specific blades for different materials, and high-quality diamond blades can be expensive. Depending on the type of tiles you are working with, you might need to invest in multiple blades, which can add significantly to your overall expenditure.
- Water Source and Pump: Wet tile saws need a consistent water supply to keep the blade cool and prevent dust. If your saw does not come with a built-in water pump, you may need to purchase one separately, along with a water reservoir, which can incur additional costs.
- Safety Equipment: Working with a wet tile saw can pose risks, and it’s essential to protect yourself. Investing in safety goggles, gloves, and possibly a dust mask (if cutting certain materials) will enhance your safety but will also add to the total budget.
- Maintenance Supplies: Regular maintenance is crucial for the longevity of your wet tile saw. This may include purchasing lubricants or cleaning agents specifically designed for tile saws, which can create ongoing costs over time.
- Additional Accessories: Depending on your project, you might require extra accessories such as a stand, cutting guides, or measuring tools. These items can enhance the performance and ease of use of the wet tile saw but will also increase the initial investment required for your DIY project.
What Are the Common Uses for a DIY Wet Tile Saw?
The common uses for a DIY wet tile saw include:
- Cutting Ceramic Tiles: A DIY wet tile saw excels at making clean, precise cuts in ceramic tiles, which are often used in various home improvement projects. The water cooling system helps to reduce the risk of chipping and ensures a smooth finish on the edges.
- Cutting Porcelain Tiles: Similar to ceramic, porcelain tiles can also be cut with a wet tile saw, but they require more care due to their density. The saw’s water feature helps keep the blade cool and prevents overheating, allowing for accurate cuts without cracking the tile.
- Beveling and Miter Cuts: Wet tile saws can be adjusted to create bevel or miter cuts, which are essential for achieving clean edges and corner joints in tile installations. This is particularly useful for creating intricate designs or when tiles meet at angles.
- Cutting Stone Tiles: Aside from ceramic and porcelain, wet tile saws can handle natural stone tiles such as granite or marble. The water helps to lubricate the cutting process, reducing dust and providing a cleaner cut through tougher materials.
- Creating Custom Tile Sizes: One of the advantages of using a DIY wet tile saw is the ability to cut tiles down to custom sizes for unique layouts or patterns. This flexibility allows homeowners to tailor their tile installations to fit specific spaces or design ideas.
- Drilling Holes in Tiles: Some wet tile saws come with attachments that allow for drilling holes in tiles, which is useful for installing fixtures or creating decorative elements. The water helps to cool the drill bit, minimizing damage to the tile during the process.
What Types of Tiles Can You Efficiently Cut with a Wet Tile Saw?
When using a wet tile saw, several types of tiles can be efficiently cut, including:
- Ceramic Tiles: Wet tile saws are particularly effective for cutting ceramic tiles due to their durability and the ability to create clean, straight cuts. The water helps to minimize dust and cool the blade, preventing overheating and extending the life of both the blade and the tile.
Porcelain tiles are denser and harder than ceramic tiles, making them more challenging to cut. However, a wet tile saw is ideal for this material as the water cools the blade, allowing for smooth cuts without chipping the edges. - Glass Tiles: Cutting glass tiles requires precision to avoid breakage, and a wet tile saw can provide this by using a diamond blade that reduces the risk of cracking. The water also helps to keep the tile from becoming too hot, which can lead to fractures.
- Stone Tiles: Natural stone tiles, such as granite or marble, are best cut with a wet tile saw due to their hardness. The cooling effect of the water prevents the blade from overheating and ensures that the cuts are clean and precise.
- Quarry Tiles: These unglazed tiles can be tricky to cut, but a wet tile saw can handle them effectively. The water helps to reduce dust and allows for a smoother cutting experience, which is essential for maintaining the integrity of the tile.
How Can Using a Wet Tile Saw Improve Your Home Improvement Projects?
Using a wet tile saw can significantly enhance your home improvement projects by providing precision and efficiency in cutting tiles.
- Precision Cutting: A wet tile saw allows for clean and accurate cuts, which is crucial for achieving a professional finish. The water used during cutting helps to keep the tile cool and reduces the risk of chipping or cracking.
- Versatility: Wet tile saws can handle various materials, including ceramic, porcelain, glass, and stone tiles. This versatility makes them an ideal tool for diverse home improvement projects, allowing you to tackle different styles and designs without needing multiple tools.
- Speed: With a wet tile saw, you can cut tiles much faster than with manual tools. The powerful blade and water cooling system enable you to complete large projects efficiently, saving both time and effort.
- Ease of Use: Most wet tile saws come with user-friendly features such as adjustable cutting angles and a guide rail for straight cuts. These features make it easier for DIYers, regardless of skill level, to achieve professional results.
- Improved Safety: The water feature in wet tile saws helps to reduce dust and airborne particles, creating a safer working environment. Additionally, the design of these saws often includes safety features to protect users while operating the tool.
What Do Customer Reviews Reveal About the Best DIY Wet Tile Saws?
Ease of use is another significant factor, with reviews highlighting models that are straightforward to operate, which is particularly appealing to novice users. Features such as clear instructions, intuitive controls, and quick assembly processes contribute to a more enjoyable experience for DIY enthusiasts.
Water management is essential for maintaining cleanliness and visibility while cutting. Customers have noted that the best wet tile saws include efficient water containment systems that minimize splashes and keep the workspace tidy, making the cutting process smoother and more efficient.
Durability is a key concern for many buyers, and reviews indicate that the best models are constructed from sturdy materials that withstand the rigors of frequent use. This resilience not only extends the lifespan of the saw but also ensures reliability during demanding projects.
Portability becomes an important factor for DIYers who may need to move their tools between different locations. Lightweight designs and integrated handles allow for easy transport, making it convenient for users to set up their saw wherever needed.
Value for money is often discussed in customer reviews, with buyers expressing satisfaction when they find a saw that delivers high performance at an affordable price. The best DIY wet tile saws are typically seen as investments that pay off through their efficiency and effectiveness in completing tile projects.
What Are Some Common Complaints From Users of DIY Wet Tile Saws?
Short blade life frustrates many users, as constantly replacing blades adds to the cost of the project. Many find that the included blades do not last long, particularly when cutting tougher materials.
Limited size capabilities are a common complaint, especially among users who wish to work with larger tiles. Many DIY wet tile saws are not designed to handle tiles beyond a certain size, restricting creative possibilities.
Inconsistent cut quality often leads to dissatisfaction, with users reporting jagged edges or misaligned cuts. This can be particularly problematic for projects that require precision, such as flooring installation or backsplash designs.
Lastly, the bulky and heavy design of some models can be a drawback for those who need to transport their saw frequently or have limited workshop space. This can lead to challenges in setup and mobility during DIY projects.
In What Ways Do Positive Reviews Highlight the Strengths of These Tools?
Positive reviews highlight the strengths of the best DIY wet tile saws in several key areas:
- Ease of Use: Many positive reviews emphasize how user-friendly these tools are, making them accessible even for beginners. Features such as adjustable settings and clear instructions help users achieve professional results without extensive experience.
- Precision Cutting: Reviewers often praise the accuracy of cuts made by these saws, noting that they can handle intricate designs and straight lines with ease. This precision is crucial for achieving high-quality finishes in tile installations.
- Durability: Positive feedback frequently mentions the robust construction of these wet tile saws, which allows them to withstand heavy use without significant wear and tear. Many models are built with high-quality materials that ensure longevity and reliability over time.
- Water Management: Many reviews highlight how effective the water containment systems are in minimizing dust and debris during cutting. This not only provides a cleaner workspace but also enhances the overall cutting performance and safety of the tool.
- Versatility: Users often note the versatility of these saws in handling various types of tiles, including ceramic, porcelain, and glass. This capability makes them a preferred choice for DIY enthusiasts who work with different materials on various projects.
- Portability: Several reviews point out the lightweight and compact design of many DIY wet tile saws, making them easy to transport and store. This portability is particularly beneficial for users who need to move the tool to different job sites or simply want to save space in their workshop.
What Safety Precautions Should You Adhere to When Using a DIY Wet Tile Saw?
When using a DIY wet tile saw, adhering to safety precautions is essential to ensure both personal safety and the effective operation of the tool.
- Wear Personal Protective Equipment (PPE): Always wear safety goggles to protect your eyes from flying debris and a dust mask to prevent inhalation of dust particles. Additionally, use ear protection since wet tile saws can be quite loud, potentially damaging your hearing over extended periods of use.
- Ensure Proper Setup: Set up the wet tile saw on a stable, flat surface to prevent it from tipping over while in use. Make sure the area is clean and free from clutter to reduce the risk of tripping or accidentally contacting the saw while moving around.
- Check Electrical Connections: Before plugging in the wet tile saw, inspect the power cord for any signs of wear or damage. Using a saw with a faulty cord can lead to electrical shock, so ensure that all connections are secure and that the saw is grounded properly.
- Keep Hands Away from the Blade: Always keep your hands at a safe distance from the blade while operating the saw. Use push sticks or other tools to guide the tiles through the saw, minimizing the risk of accidents and injuries.
- Wet Conditions Management: Since these saws use water to cool the blade and minimize dust, be mindful of the wet conditions around the work area. Ensure that the saw is placed in a way that prevents water accumulation that could lead to slips or falls.
- Read the Manual: Before operating the wet tile saw, thoroughly read the manufacturer’s manual to understand its specific features and safety guidelines. Familiarizing yourself with the tool’s operation can prevent misuse and enhance your safety while using it.
How Can You Ensure Your Safety While Operating a Wet Tile Saw?
Ensuring safety while operating a wet tile saw is crucial to prevent accidents and injuries.
- Wear Personal Protective Equipment (PPE): Always wear safety goggles, gloves, and a dust mask to protect yourself from flying debris, sharp tile fragments, and any dust generated during cutting.
- Keep the Work Area Clean and Dry: Maintain a tidy workspace to avoid tripping hazards and ensure that the wet area does not become slippery, which can lead to falls.
- Use the Correct Blade: Ensure that the saw is equipped with the appropriate diamond blade for the type of tile being cut, as this will enhance cutting efficiency and reduce the risk of kickbacks.
- Follow Manufacturer’s Instructions: Each wet tile saw comes with specific operational guidelines; adhering to these instructions will help avoid misuse and accidents.
- Stabilize the Workpiece: Secure the tile properly before cutting to prevent it from shifting, which can lead to inaccurate cuts or potential injury.
- Check Electrical Safety: Inspect power cords and plugs for any damage before use, and ensure that the saw is connected to a GFCI outlet to protect against electrical shock.
Wearing proper PPE like safety goggles, gloves, and a dust mask is essential as it safeguards you against flying debris and sharp tile pieces. This basic yet vital step minimizes the risk of eye injuries and skin cuts while also reducing inhalation of harmful dust particles.
Keeping the work area clean and dry is important to prevent slips and trips. A clutter-free space allows for better maneuverability around the saw, reducing the chances of accidents caused by distractions or unexpected obstacles.
Using the correct blade for the specific type of tile is critical; the right diamond blade not only ensures more efficient cutting but also reduces the likelihood of kickbacks, which can cause serious injuries. Selecting the appropriate blade enhances both the performance and safety of the saw.
Following the manufacturer’s instructions is paramount for safety and effective operation. These guidelines are designed to help users understand the saw’s features and limitations, thereby minimizing the risk of misuse that could lead to accidents.
Stabilizing the workpiece before making cuts is crucial to ensure accuracy and safety. A securely held tile prevents unexpected movements that could result in improper cuts or injuries to the operator.
Checking electrical safety is essential to prevent electrical shocks or fires. Always inspect cords for damage and ensure the saw is plugged into a Ground Fault Circuit Interrupter (GFCI) outlet, which provides an added layer of protection during wet operations.
What Personal Protective Equipment Should Be Used During Tile Cutting?
When cutting tile, it’s essential to use the right personal protective equipment (PPE) to ensure safety and prevent injury.
- Safety Glasses: Safety glasses protect your eyes from flying debris and dust particles generated during tile cutting. They are crucial for preventing eye injuries, which can occur if small shards break off during the cutting process.
- Hearing Protection: Hearing protection such as earplugs or earmuffs is important when using a wet tile saw, as these tools can produce loud noise levels that may lead to hearing damage over prolonged exposure. Ensuring your hearing is protected will help maintain long-term auditory health.
- Dust Mask or Respirator: A dust mask or respirator is recommended to protect your lungs from fine dust created by cutting tiles. This is particularly important when working with ceramic or porcelain tiles, which can release harmful particles into the air.
- Gloves: Heavy-duty gloves can protect your hands from sharp edges and accidental cuts while handling tiles. They also provide a better grip on the tile, reducing the risk of slips and mishandling during the cutting process.
- Steel-Toe Boots: Wearing steel-toe boots can protect your feet from heavy tiles that may accidentally drop during installation or cutting. These boots are designed to withstand impacts and provide extra safety in a workshop or construction environment.
- Long Sleeves and Pants: Wearing long sleeves and pants made of durable material can protect your skin from scratches and cuts caused by sharp tile edges. This layer of clothing also helps to minimize dust exposure and offers another level of safety while working.