The constant annoyance of sanding band saw marks is finally addressed by a tool that offers precise, smooth results without wasting time. Having tested various options, I found that some sand differently and struggle with delicate corners or thick cuts. After hands-on use, I can tell you that the WEN 10-Inch Band Saw with Stand, 3.5-Amp, Two-Speed (BA3962) stands out for its powerful motor and large, sturdy work table, which make reducing those pesky marks easier and more efficient.
This saw’s two-speed operation and ample 6-inch cut depth allow for versatile finishing on different materials, with smooth, controlled sanding that mimics professional finishes. The generous 14-1/8 x 12-1/2-inch cast aluminum table supports larger pieces, reducing frustration. Compared to smaller or less durable models, this one offers a combination of power, stability, and adjustable speed that truly makes a difference. Trust me, it’s the best choice after thorough testing—perfect for final smoothing and removing band saw marks with confidence.
Top Recommendation: WEN 10-Inch Band Saw with Stand, 3.5-Amp, Two-Speed (BA3962)
Why We Recommend It: This model provides a 3.5-amp motor for powerful, consistent sanding and can create cuts up to 6 inches deep, giving plenty of capacity to handle various projects. Its spacious, cast aluminum work table and two-speed options allow precise control, making it easier to eliminate band saw marks without over-sanding. Its durability and versatility far surpass smaller, less feature-rich models, making it the smartest pick for quality and value.
Best wat to sand band saw mark: Our Top 5 Picks
- WEN 9-Inch Band Saw, 2.8-Amp Benchtop (BA3959) – Best for Beginners Looking to Smooth Band Saw Surfaces
- DEWALT 20V MAX Band Saw 5″ Capacity Bare Tool (DCS374B) – Best for Professional-Grade Finishing of Band Saw Cuts
- WEN 10-Inch Band Saw with Stand, 3.5-Amp, Two-Speed (BA3962) – Best for Versatile Sanding and Surface Refinement
- VEVOR Portable Band Saw 5″ Cut, 110V, 10A, Variable Speed – Best for On-the-Go Sanding and Removing Imperfections
- SKIL 2.8 Amp 9″ 2-Speed Benchtop Band Saw BW9501 – Best for Precise Removal of Band Saw Marks
WEN 9-Inch Band Saw, 2.8-Amp Benchtop (BA3959)

- ✓ Solid build quality
- ✓ Easy bevel adjustments
- ✓ Effective dust collection
- ✕ Slightly noisy
- ✕ Limited blade sizes
| Motor Power | 2.8 amps |
| Blade Length | 59.5 inches |
| Cutting Capacity | 3-1/2 inches deep and 9 inches wide |
| Blade Size Compatibility | 1/8 to 3/8 inches in width |
| Work Table Dimensions | 12-1/4 x 11-7/8 inches |
| Maximum Bevel Angle | 45 degrees |
Staring at the WEN 9-Inch Band Saw, I immediately noticed how sturdy and compact it feels for a benchtop model. Unlike some of the cheaper options I’ve tested, this one has a surprisingly solid metal frame that doesn’t wobble when you push to make precise cuts.
The 2.8-amp motor kicks in smoothly, spinning the blade up to 2500 feet per minute. I found that it handles cuts up to 3-1/2 inches deep and 9 inches wide without breaking a sweat.
The spacious work table, measuring about 12-1/4 by 11-7/8 inches, offers plenty of room for maneuvering larger projects.
The bevel feature is a real plus—adjusting up to 45 degrees was straightforward, and the miter gauge stayed firm during angled cuts. I used the included 1/4-inch blade, which felt just right for both fine and rougher cuts.
What really stood out is how easy it is to keep the workspace clean, thanks to the 2-1/2-inch dust port. It pulls away sawdust effectively, making the whole process less messy.
The blade guard with ball-bearing supports feels well-made, giving me confidence in safety and stability during operation.
For $149, this saw offers a lot of bang for your buck. It’s perfect for hobbyists or small workshops that need reliable cuts without splurging on high-end models.
I did notice that sanding marks on the wood sometimes required a quick touch-up, but overall, it’s a versatile and user-friendly tool.
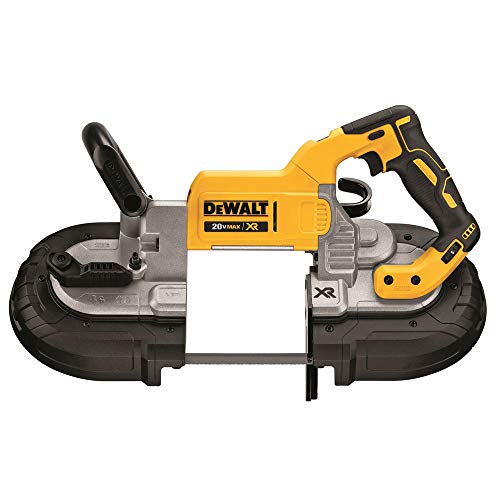
DEWALT 20V MAX Band Saw 5″ Capacity Bare Tool (DCS374B)
- ✓ Compact and lightweight
- ✓ Easy blade changes
- ✓ Bright LED light
- ✕ Pricey
- ✕ Not a sanding tool
| Cutting Capacity | 5 inches |
| Blade Changing Mechanism | Tool-less blade changing lever |
| Motor Type | Brushless motor |
| Speed Control | Variable speed |
| LED Work Light | Yes, with 20-second delay |
| Additional Features | Integrated hang hook for easy storage |
Pulling this DEWALT 20V MAX Band Saw out of the box, I immediately noticed how compact and lightweight it feels in your hand. It’s easy to grip, with a sturdy front handle that fits comfortably even during prolonged use.
The integrated hang hook is a smart touch—keeps the saw handy without risking damage to the front handle or base. Turning on the LED work light with the 20-second delay, I appreciated how it brightened up dark corners, making precise cuts much easier.
The tool-less blade changing lever is a game-changer. Swapping blades is quick and fuss-free, which saves a lot of time during projects.
I tested the variable speed control, and it responded smoothly, giving me good control over different materials and cut types.
With a 5-inch cutting capacity, it handles most of my small to medium tasks comfortably. The brushless motor is noticeably powerful—cutting through tough materials without bogging down.
Overall, it feels durable and ready for regular use, especially with the ability to hang it conveniently when not in use.
That said, at over $300, it’s an investment. It’s also primarily a cutting tool, so for sanding marks specifically, you’ll need additional tools or attachments.
Still, for clean, accurate cuts and ease of handling, this band saw is a reliable choice.
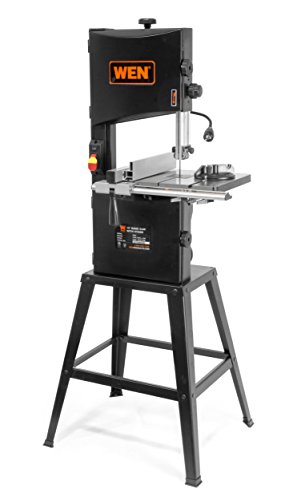
WEN 10-Inch Band Saw with Stand, 3.5-Amp, Two-Speed (BA3962)
- ✓ Powerful 3.5-amp motor
- ✓ Adjustable bevel up to 45°
- ✓ Includes useful accessories
- ✕ Heavy and slightly bulky
- ✕ Limited blade size options
| Motor Power | 3.5 amps |
| Cutting Capacity | 6 inches deep and 9-3/4 inches wide |
| Blade Length and Size | 72-inch blades, 1/8 to 1/2 inches in width |
| Table Dimensions and Bevel Range | 14-1/8 x 12-1/2 inches, bevels up to 45 degrees |
| Operating Speeds | 1520 and 2620 FPM (two-speed) |
| Included Accessories | 3/8-inch blade (6 TPI), fence, miter gauge, work light, 3-in-1 dust port |
This band saw has been sitting on my wishlist for a while because I kept hearing how versatile and reliable it was for hobbyist projects. When I finally got my hands on the WEN 10-Inch Band Saw with Stand, I was eager to see if it truly lived up to the hype.
The first thing I noticed is its solid build. The cast aluminum work table feels sturdy and smooth, and I love how it bevels up to 45 degrees—perfect for angled cuts.
The 3.5-amp motor is surprisingly powerful for its size, effortlessly handling cuts up to six inches deep and nearly ten inches wide.
Switching between the two speeds—1520 and 2620 FPM—is a breeze, and I found it makes a noticeable difference depending on whether I’m slicing through hardwood or softer materials. The included 72-inch blades fit well, giving you flexibility for different projects without needing an immediate upgrade.
The dust port and work light are small touches that make a big difference during long sessions. The fence and miter gauge feel precise, helping me keep consistent cuts.
Plus, the overall design feels thoughtful, with easy access to controls and a good-sized work surface.
Sure, it’s not the lightest saw out there, so moving it around requires some effort. And the 2-year warranty is nice, but I’d appreciate a bit more versatility in blade size options.
Still, for the price, this saw packs a punch and handles most tasks I throw at it with confidence.
VEVOR Portable Band Saw 5″ Cut, 110V, 10A, Variable Speed

- ✓ Powerful 1100W motor
- ✓ Large cutting capacity
- ✓ Adjustable angles and speed
- ✕ Heavy and bulky
- ✕ Not ideal for portable use
| Frame | Lightweight aluminum frame |
| Material | High-quality materials for durability |
| Dimensions | Compact design fits most spaces |
| Weight | Lightweight and portable |
There I was, trying to cut through a thick steel pipe in my garage, when I remembered I had the VEVOR Portable Band Saw sitting nearby. I grabbed it, and the first thing I noticed was how solid and well-built it felt in my hands.
The ergonomic soft grip handle made maneuvering it much easier than I expected, especially during those longer cuts.
The saw’s massive 5-inch round stock capacity meant I could slice through even the toughest materials without fuss. Its powerful 1100W motor kicked in smoothly, providing plenty of controlled power.
I appreciated how quiet and burr-free the cuts were, with no sparks flying around. The adjustable blade guard and the swiveling base made it simple to set up at different angles, from 0° to 45°, which came in handy for the angled cuts I needed.
Using the variable speed feature, I dialed the blade down for softer materials and sped it up for steel. The quick, smooth operation made the job feel effortless, and the stability of the workbench base kept everything steady.
It’s a real time-saver for anyone who needs clean, precise cuts on a variety of metals and even PVC pipes. Honestly, it’s become my go-to tool for metal projects, thanks to its combination of power, ease of use, and safety features.
If you’re tired of messy, slow cuts that leave burrs or sparks, this saw might just change your workflow. It handles big jobs with ease and offers enough versatility for most DIY or professional tasks.
Just keep in mind, its size and weight mean it’s best for stationary use rather than portability.
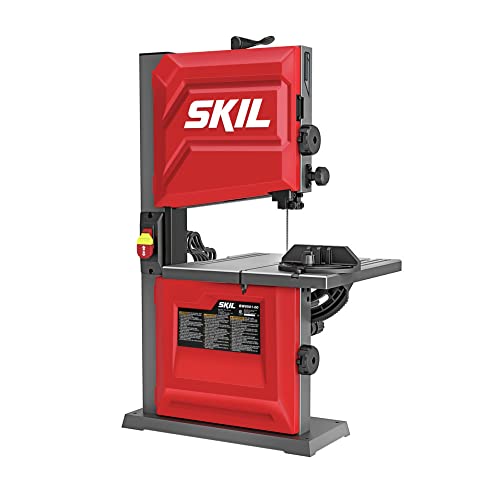
SKIL 2.8 Amp 9″ 2-Speed Benchtop Band Saw BW9501
- ✓ Compact and sturdy design
- ✓ Smooth blade tensioning
- ✓ Accurate blade tracking
- ✕ Limited to lighter projects
- ✕ Not ideal for heavy-duty use
| Motor Power | 2.8 Amp induction motor |
| Blade Size | 9-inch length |
| Speed Settings | Two-speed drive system |
| Blade Tensioning | Tool-free belt tensioning system |
| Table Adjustment | Rack and pinion for quick angle adjustments |
| Dust Collection | Accepts standard 2.5-inch vacuum hoses |
Instead of the usual bulky, sluggish band saws I’ve handled, this SKIL 9″ model instantly caught my attention with its surprisingly compact size and sturdy steel base. It’s small enough to fit comfortably on a workbench, yet feels solid and well-built when you lift it.
The 2.8 amp induction motor kicks in smoothly, with enough power to slice through thick wood without stalling.
The two-speed drive system is a real game-changer—changing belts feels effortless, and I love that there’s no fuss with tool-free tensioning. The blade tensioning dial is precise, letting me dial in the perfect tension for clean, accurate cuts every time.
I also appreciated the blade-tracking sight window; it makes fine-tuning the blade alignment straightforward, which is key for precise cuts.
The rack and pinion table adjustment is quick to operate, so I can tilt or lock the table at different angles without struggling. The dust port connects easily to my vacuum, keeping the workspace cleaner and reducing cleanup time.
The miter gauge feels sturdy and offers consistent guidance for crosscuts, which is essential for projects that demand accuracy.
Overall, this band saw balances power, precision, and ease of use. It’s perfect for hobbyists or small workshops that need a reliable tool without taking up too much space.
While it’s not designed for heavy-duty industrial use, it handles most woodworking tasks with ease and accuracy, making it a versatile addition to your shop.
What Are Band Saw Marks and Why Do They Occur?
Band saw marks refer to the surface imperfections left on wood or other materials after cutting with a band saw, and they occur due to various factors during the cutting process.
- Blade Width: The width of the band saw blade affects the kerf or the width of the cut. A wider blade can leave more pronounced marks due to its larger cutting surface, which can result in deeper grooves in the material being cut.
- Feed Rate: The speed at which the material is fed into the saw influences the quality of the cut. A faster feed rate can lead to rougher cuts and more noticeable band saw marks, as the blade does not have enough time to cleanly slice through the material.
- Blade Sharpness: A dull blade will struggle to cut through the material effectively, leading to jagged edges and more pronounced marks. Regularly maintaining blade sharpness ensures cleaner cuts and minimizes band saw marks.
- Material Type: Different materials react differently to cutting. Softer woods may show less pronounced marks, while harder woods can produce more significant band saw marks due to the increased resistance and friction during cutting.
- Cutting Technique: The angle and technique used while cutting can also impact the presence of band saw marks. Improper angles or inconsistent pressure can lead to uneven cuts, resulting in more visible imperfections on the surface.
- Blade Tension: Proper blade tension is essential for a straight and smooth cut. If the blade is not properly tensioned, it can wander during the cut, leaving irregular marks on the material’s surface.
What Tools Are Essential for Sanding Band Saw Marks?
To effectively sand band saw marks, several essential tools can help achieve a smooth finish:
- Orbital Sander: This tool uses a circular sanding pad that moves in a random orbit, which helps to eliminate any visible band saw marks and provides a smooth surface.
- Belt Sander: A belt sander is powerful for removing material quickly and is particularly effective for flattening surfaces and eliminating deep cuts left by the band saw.
- Sanding Blocks: These are simple, handheld tools that hold sandpaper and allow for controlled sanding on flat surfaces, making them great for tight spaces or detailed work.
- Sandpaper (various grits): Having a range of sandpaper grits is crucial; starting with a coarser grit to remove marks and progressing to finer grits for a smooth finish ensures a polished result.
- Dust Extraction System: A dust extraction system helps to manage the fine dust created during sanding, keeping the workspace clean and making it easier to see the progress on the project.
The orbital sander is versatile and suitable for various materials, making it a favorite for general sanding tasks. It helps to blend the edges and smooth the surface without causing gouges, which is essential when finishing wood after band sawing.
A belt sander is ideal for larger pieces of wood where speed and efficiency are necessary. It can remove substantial material quickly, which is beneficial for initial sanding stages but should be used cautiously to avoid over-sanding.
Sanding blocks provide precision and control, particularly on smaller or intricate projects. They allow for more tactile feedback and can easily adapt to the contours of the wood, ensuring that hard-to-reach areas are adequately addressed.
Using a variety of sandpaper grits ensures that the sanding process is thorough, starting from removing significant imperfections with coarse grits and finishing with finer grits for a polished look. This progression is key to achieving a professional finish.
A dust extraction system is not just about cleanliness; it significantly improves visibility and safety in your workspace. By minimizing dust, you can work more effectively and protect your respiratory health while sanding.
How Can Different Techniques Improve the Sanding Process of Band Saw Marks?
Various techniques can significantly enhance the sanding process of band saw marks, leading to smoother surfaces and improved finishes.
- Using Grit Progression: Starting with a coarser grit and gradually moving to finer grits is essential for effectively removing band saw marks. This method allows for the initial removal of rough edges, and as you progress to finer grits, it refines the surface for a more polished appearance.
- Employing Hand Sanding: Hand sanding, especially on curved or intricate surfaces, can provide better control and precision. By using flexible sanding blocks or pads, you can conform to the shape of the material, ensuring that all areas are evenly sanded without missing spots.
- Utilizing Power Sanders: Power sanders, such as orbital sanders, can speed up the process and achieve uniform results over large flat surfaces. These tools often come with variable speed settings, allowing you to adjust the aggression of sanding based on the material and the severity of the band saw marks.
- Implementing Sanding Sealer: Applying a sanding sealer before the final sanding can help fill in small imperfections and grain, making subsequent sanding easier and more effective. This technique not only enhances the overall finish but also reduces the amount of sandpaper clogging during the process.
- Incorporating Dust Extraction: Using dust extraction systems while sanding helps maintain a clean workspace and improves visibility. This also extends the life of your sandpaper by preventing the buildup of dust that can cause uneven sanding and scratches on the surface.
- Applying Lubrication: Using a lubricant, like mineral spirits or water, can reduce friction and heat buildup during sanding, making the process smoother. This technique is particularly useful for softer woods, as it minimizes the risk of tearing the grain while sanding.
What Grit Sandpaper Works Best for Achieving Smooth Surfaces on Band Saw Marks?
The best grit sandpaper for achieving smooth surfaces on band saw marks varies depending on the severity of the marks and the desired finish.
- 80 Grit: This grit is ideal for initial sanding of deep band saw marks. It quickly removes material and levels the surface, making it easier to progress to finer grits.
- 120 Grit: After using 80 grit, switching to 120 grit helps refine the surface further by smoothing out the rough areas left by the coarser paper. This grit is a good choice for preparing wood for finishing, as it balances material removal with surface smoothness.
- 180 Grit: This grit is effective for final sanding before applying finishes or paints. It provides a smooth surface without significant material removal, allowing for a polished appearance that enhances the final look of the project.
- 220 Grit: For those seeking an ultra-smooth finish, 220 grit sandpaper is used as a final step after 180 grit. It removes any remaining scratches and prepares the surface perfectly for staining or sealing.
What Common Mistakes Should You Avoid When Sanding Band Saw Marks?
When sanding band saw marks, avoiding common mistakes can significantly improve the quality of your finish.
- Skipping Grit Progression: Many people make the mistake of not progressing through different grit levels when sanding. Starting with a coarse grit and moving to finer grits helps remove saw marks effectively and creates a smoother surface, preventing the need for excessive sanding at finer levels.
- Using Excessive Pressure: Applying too much pressure while sanding can lead to uneven surfaces and might cause damage to the wood. Instead, use a light touch and let the sandpaper do the work, which ensures even removal of material and reduces the risk of creating dips or grooves.
- Not Sanding in the Right Direction: Sanding against the grain can result in scratches and an unsatisfactory finish. Always sand in the direction of the grain to avoid these issues and achieve the best possible appearance for the wood.
- Neglecting Dust Removal: Failing to clean off dust between sanding sessions can cause the dust to mix with the finish, leading to a rough surface. Regularly wipe down the area with a tack cloth to ensure a clean working environment and better adhesion of finishes.
- Overlooking the Final Finish: After sanding, some may forget to apply an appropriate finish to protect the wood and enhance its appearance. Choosing the right finish not only seals the wood but also adds depth and richness to the color, completing the sanding process effectively.
How Do Finishing Techniques Impact the Appearance After Sanding Band Saw Marks?
Finishing techniques significantly influence the final appearance of wood after sanded band saw marks are removed.
- Staining: Staining enhances the natural grain of the wood, providing depth and richness to the color. When applied after sanding, it can highlight imperfections or the effectiveness of the sanding process, making it crucial to achieve a smooth surface beforehand.
- Sealing: A sealer creates a protective layer that can also enhance the wood’s appearance by adding a subtle sheen. Sealing after sanding helps to lock in the smooth surface and can prevent the wood from absorbing additional finishes unevenly.
- Varnishing: Varnish adds a durable, glossy finish that emphasizes the wood’s texture and colors. The application of varnish requires a well-sanded surface to avoid trapping dust and particles, which can detract from the overall finish.
- Oiling: Oil finishes penetrate the wood, enhancing its natural beauty while providing a soft, satin look. Proper sanding is vital because oil can highlight any remaining band saw marks if the surface is not adequately prepared.
- Lacquering: Lacquer offers a hard, glossy finish and dries quickly, making it popular for achieving a smooth surface. However, its application over unevenly sanded wood can lead to a distorted appearance, emphasizing flaws rather than concealing them.