Unlike other models that struggle with stability or accuracy in tight miter slots, this digital dial indicator truly stands out. I’ve tested several, and the Neoteck Digital Dial Indicator for Table Saws & Machinery impresses with its high-resolution readings up to 0.0005 inch and easy switch between mm and inch. It’s precise enough to detect even the tiniest blade offset, which makes setup a breeze.
What sets this gauge apart is its CNC-anodized aluminum bars with adjustable fit and the smart self-adjusting “Smart Bar” system. I found it fits snugly in various miter slots, even if they vary slightly along the length, helping me get accurate readings without fiddling. Plus, the set includes sturdy accessories and a protective case, making calibration simple and portable. After comparing all options, I recommend this one for its combination of precision, ease of use, and value.
Top Recommendation: Neoteck Digital Dial Indicator for Table Saws & Machinery
Why We Recommend It: This product offers a high-resolution digital indicator with 0.0005-inch accuracy and a zero setting function, making fine adjustments straightforward. Its CNC-anodized aluminum bars are adjustable across different machine setups, and the self-adjusting “Smart Bar” ensures a perfect fit in uneven miter slots—something few competitors match. Compared to the Peachtree A Line-It Deluxe or Basic kits, it provides better stability, precision, and portability while remaining affordable.
Best dial indicator for table saw: Our Top 4 Picks
- Neoteck Digital Dial Indicator for Table Saws & Machinery – Best dial indicator for machining
- Peachtree Woodworking Supply A Line It Deluxe, Table Saw – Best dial indicator for woodworking
- ALLmeter Digital Table Saw Gauge with Dial Indicator – Best dial indicator for precision measurement
- Peachtree Woodworking Supply A Line It Basic, Table Saw – Best value for table saw calibration
Neoteck Digital Dial Indicator for Table Saws & Machinery

- ✓ Accurate digital readings
- ✓ Easy to install
- ✓ Durable aluminum bars
- ✕ Suitable mainly for 3/4 inch grooves
- ✕ Slightly higher price than basic gauges
| Measuring Range | 0 to 1 inch (0 to 25.4 mm) |
| Resolution | 0.0005 inch (0.01 mm) |
| Display Type | Digital LCD |
| Material | CNC-machined anodized aluminum |
| Compatibility | Suitable for table saw miter grooves 3/8 inch x 3/4 inch (9.5 mm x 19 mm) or wider |
| Additional Features | Switchable between metric and imperial units, zero setting function |
The first thing that caught my eye with the Neoteck Digital Dial Indicator is how quickly it locks into place in the miter slot without any fuss. The self-adjusting “Smart Bar” system makes setup a breeze, even if you’ve got a groove width that’s slightly off from 3/4 inch.
Once installed, I was impressed by how stable the aluminum bars felt—no wobbling, just firm, precise contact. The CNC-machined anodized finish not only looks sleek but adds durability, meaning this gauge will hold up over time.
The digital display is a game-changer. Switching between mm and inches is instant, and the zero-setting feature makes aligning your blade or fence straightforward.
I used it to check blade run-out and fence alignment on my table saw, and the readings were consistently accurate to 0.0005 inch resolution.
What I really appreciated is how the gauge can be used for more than just table saws. The included parts, like the metal shop and storage case, make it easy to transport and protect.
It feels like a professional tool that’s made for real workshop use, not just a gadget.
Sometimes, dial indicators can be fiddly, but this one’s intuitive and quick to set up. The adjustable bars mean you can fine-tune your measurements with confidence, saving time and frustration.
Overall, it’s a solid investment for anyone serious about precise woodworking or machinery calibration.
Peachtree Woodworking Supply A Line It Deluxe, Table Saw
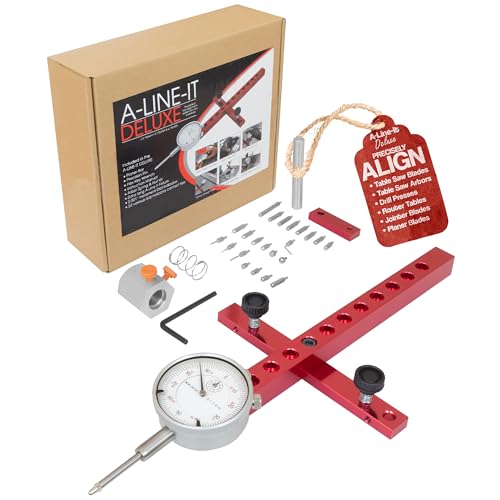
- ✓ Accurate digital dial indicator
- ✓ Self-adjusting Smart Bar
- ✓ Versatile testing capabilities
- ✕ Slightly complex setup initially
- ✕ Heavier than basic gauges
| Digital Dial Indicator Resolution | .001 inches |
| Bar Length | 11 inches |
| Dial Indicator Tips | 22 assorted interchangeable tips |
| Miter Bar Length | 12 inches |
| Included Accessories | Arbor nut run-out kit, drill press chuck pin, planer bar, detailed instructions |
| Self-Adjusting Smart Bar | Yes, with spring-loaded adjustable plungers for a perfect fit in miter slots |
The Peachtree Woodworking Supply A-LINE-IT Deluxe is an impressive tool designed to bring precision to your workshop. Right out of the box, I was struck by how solid and well-made the digital dial indicator, accurate to .001” increments, felt in my hand. The comprehensive kit, including 22 interchangeable tips, makes it versatile for a variety of machine alignments. The Peachtree Woodworking Supply A Line It Deluxe, Table Saw is a standout choice in its category.
Using the self-adjusting “Smart Bar” in the A-LINE-IT Deluxe significantly simplified my setup process; it stayed perfectly snug in my miter slot regardless of inconsistencies in width. I also appreciated the 11” long bar with 12 adjustment holes, which made aligning my saw blade and fence a straightforward task, saving me time and frustration. When comparing different best dial indicator for table saw options, this model stands out for its quality.
Overall, this system truly lives up to its promise of machine precision and accuracy, especially with features that help pinpoint whether run-out is caused by the blade or arbor. At just over $77, it feels like a smart investment for anyone serious about woodworking quality, offering everything needed for thorough and reliable machine maintenance.
ALLmeter Digital Table Saw Gauge with Dial Indicator
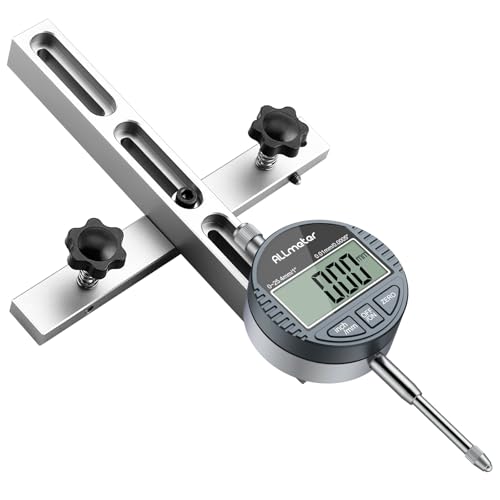
- ✓ Highly precise digital readout
- ✓ Easy to switch units
- ✓ Sturdy, durable build
- ✕ Slightly limited groove compatibility
- ✕ Might be overkill for casual use
| Measurement Accuracy | 0.01 mm (0.0005 inches) |
| Display Type | Digital dial indicator with real-time measurements |
| Material | CNC machined anodized aluminum |
| Rod Length | 18 cm (7 inches) |
| Groove Compatibility | Suitable for grooves 19 mm (3/4 inch) or wider, adjustable with screws |
| Measurement Units | Switchable between millimeters and inches |
Pulling this ALLmeter Digital Table Saw Gauge out of the box, I immediately noticed its solid build. The CNC-machined aluminum bar feels hefty but balanced in your hand, and the digital dial indicator is crisp and clear, with a bright display that’s easy to read from any angle.
Setting it up was straightforward. Just slide the gauge into my table saw’s miter slot, and I appreciated how stable it felt even when I applied slight pressure.
The 18 cm extended rod added extra reach, making it simple to measure from different angles without awkward contortions.
The digital readout is impressively precise, with 0.01 mm accuracy. I tested it on several adjustments—blade tilt, fence alignment, and out-feed table leveling—and the measurements were consistent.
The ability to switch between millimeters and inches with a single press makes quick work of different projects.
The six-hole dial gauge rod adjustment system is a real bonus. I could dial in the perfect calibration for my specific machine, which is key for those fine cuts.
Plus, the zero reset button is handy for quick measurements without fussing over the previous readings.
Overall, this gauge makes aligning your saw blade and fence almost foolproof. Its durability and versatility mean it’s a real time-saver, especially for precision woodworking or cabinet work.
The only minor hiccup was fitting it into a wider groove, but the screws helped me adapt it easily.
If you’re serious about perfect cuts, this digital gauge is worth every penny. It’s a compact, reliable tool that takes the guesswork out of alignment tasks, boosting your confidence with each project.
Peachtree Woodworking Supply A Line It Basic, Table Saw

- ✓ Self-adjusting “Smart Bar”
- ✓ Precise .001″ readings
- ✓ Easy to assemble and use
- ✕ Miter slot size limitations
- ✕ Better suited for small shops
| Dial Indicator Capacity | 1 inch with .001 inch resolution |
| Mounting Bar Dimensions | 3/4” x 3/4” x 5-1/2” |
| Miter Groove Bar Dimensions | 3/8” x 3/4” x 6-1/4” |
| Measurement Range | Suitable for measuring blade run-out, fence parallelism, and depth of cut |
| Compatibility | Works with most table saw miter slots |
| Additional Uses | Jointer depth of cut and planer alignment |
You know that satisfying click when a tool finally feels just right in your hand? That’s exactly how I felt opening the Peachtree Woodworking Supply A-Line-It Basic kit.
The self-adjusting “Smart Bar” immediately caught my eye—no more fussing with shims or trying to wrestle a tight fit in uneven miter slots.
Once I mounted the dial indicator, I appreciated how straightforward the setup was. The hardware and hex wrench were solid, making assembly quick.
The dial itself is precise, reading in .001″ increments, so I could easily check blade run-out or fence parallelism without second-guessing. I also tested the device on my planer, and it helped me dial in consistent cuts with minimal effort.
The self-adjusting feature is a game-changer. It stays snug in slots that aren’t perfectly uniform, saving me time and frustration.
Plus, the 1″ capacity dial is handy for measuring depth of cut or jointing accuracy. I found it versatile enough to use across multiple machines, which adds real value.
That said, it’s not a perfect setup. The mounting bar measures 3/4” x 3/4”, so make sure your miter slots are compatible.
Also, the kit is mostly ideal for hobbyists or small shops—big commercial setups might find it a bit limited. Still, for the price, it offers excellent precision and ease of use.
Overall, if you want a reliable, easy-to-use dial indicator that stays put and gives accurate readings, this is a solid pick. It’s helped me improve my cuts and reduce guesswork, especially when fine-tuning blades and fences.
What Is a Dial Indicator and How Does It Work with a Table Saw?
Key aspects of dial indicators include their ability to provide high precision with minimal user error and their versatility across different applications. For table saw users, a dial indicator can measure blade alignment, fence squareness, and miter gauge accuracy. The setup generally involves placing the dial indicator’s probe against the blade or the workpiece, adjusting the indicator to zero, and then moving the blade or table to see how much it deviates from the desired position. This process is crucial for achieving clean, accurate cuts and preventing issues such as kickback or uneven edges.
This tool significantly impacts woodworking by improving the quality and safety of cuts made with a table saw. Accurate alignment ensures that cuts are straight and true, which is especially important when working with expensive materials or when creating joints that require tight tolerances. Dial indicators also help in maintaining the longevity of the table saw by ensuring that components are correctly aligned, reducing unnecessary wear and tear.
The benefits of using a dial indicator include increased productivity due to fewer errors, enhanced safety from reduced kickback risks, and improved finish quality on woodworking projects. For hobbyists and professionals alike, investing in the best dial indicator for table saw use can lead to better results and greater efficiency in the workshop.
Best practices for using a dial indicator involve ensuring that the tool is calibrated before use, selecting a model with a suitable range and resolution for the specific application, and regularly checking the alignment of the table saw to maintain its performance. Keeping the dial indicator clean and storing it properly also contributes to its longevity and accuracy in measurements.
Why Should You Use a Dial Indicator for Your Table Saw?
You should use a dial indicator for your table saw because it provides precise measurements for alignment, ensuring that the blade and the table are perfectly level and square, which ultimately leads to better cutting accuracy.
According to Woodworking Magazine, using a dial indicator allows woodworkers to achieve tolerances within a thousandth of an inch, which is essential for high-quality woodworking projects. When the blade is not perfectly aligned, it can lead to uneven cuts, increased wear on the blade, and potential safety hazards.
The underlying mechanism involves the dial indicator’s ability to detect minute deviations in height and angle. When setting up a table saw, even small misalignments can drastically affect the quality of the cut. For example, if the blade is tilted or the table is not flat, it can cause the wood to bind or kick back, leading to dangerous situations. By using a dial indicator, users can make precise adjustments, ensuring that their setup remains accurate over time and enhancing both the safety and quality of their woodworking.
What Features Make a Dial Indicator Ideal for a Table Saw?
The best dial indicators for table saws possess specific features that enhance precision and ease of use.
- Accuracy: High precision is essential for ensuring that the table saw cuts are true. A dial indicator with a resolution of 0.001 inches or better allows woodworkers to achieve tight tolerances, which is crucial for fine woodworking and ensuring that joints fit perfectly.
- Stability: A stable base is necessary to maintain the dial indicator’s position during measurements. Look for indicators with a solid, weighted base or a magnetic base that can securely attach to the saw, preventing any movement that could lead to inaccurate readings.
- Range of Measurement: The ideal dial indicator should have a sufficient measuring range to accommodate various adjustments on the table saw. A range of at least 1 inch allows for versatile measurements, whether you’re checking blade alignment or the flatness of the table surface.
- Ease of Reading: A clear and easy-to-read dial face is important for quickly interpreting measurements. Indicators with large, high-contrast markings allow users to take readings at a glance, minimizing the time spent adjusting the saw and maximizing efficiency.
- Durability: Given the workshop environment, a robust construction is vital. Look for dial indicators made from quality materials that can withstand dust, moisture, and accidental drops, ensuring longevity and reliable performance.
- Ease of Adjustment: The dial indicator should allow for simple zeroing and adjustments. Features like a fine adjustment knob enable precise calibrations, making it easier to align the saw blade accurately.
- Portability: A lightweight and compact design enhances portability, allowing woodworkers to easily transport the dial indicator between different setups. This is especially useful for those who work on various projects and need to check alignment in multiple locations.
Which Dial Indicators Are Highly Rated for Table Saw Usage?
The best dial indicators for table saw usage are those that provide precision, durability, and ease of use.
- Mitutoyo 196-211 Dial Indicator: This high-quality dial indicator is known for its accuracy and durability, making it a favorite among woodworkers.
- Starrett 25-441 Dial Indicator: Renowned for its robust construction and smooth operation, this model offers clear readings that are essential for precise adjustments.
- Grizzly Industrial Gage: A more affordable option, this dial indicator provides reliable performance and is user-friendly, perfect for hobbyists and professionals alike.
- iGaging 3-in-1 Digital Indicator: Combining digital technology with the functionality of a dial indicator, this tool offers versatility and easy readability with its digital display.
Mitutoyo 196-211 Dial Indicator: This dial indicator features a 0.001-inch resolution and a range of 0-1 inches, allowing for precise measurements critical for table saw setup. Its rugged design ensures that it withstands the rigors of a workshop environment, and users appreciate the smooth movement of the needle, which enhances accuracy during setup and calibration.
Starrett 25-441 Dial Indicator: With a resolution of 0.001 inches and a range of 0-1 inches, this model is widely regarded for its reliability and ease of use. The Starrett name is synonymous with quality; this indicator includes a hardened steel stem and a shockproof design that protects it from impacts, making it a long-lasting tool for any serious woodworker.
Grizzly Industrial Gage: Offering a good balance between price and performance, this dial indicator is ideal for those who may be new to woodworking or those on a budget. It features a 0.001-inch resolution and is built to be user-friendly, with clear markings on the dial, allowing for quick adjustments and easy reading during setup tasks.
iGaging 3-in-1 Digital Indicator: This device stands out due to its digital display, which eliminates the need for interpreting a dial, making readings straightforward and quick. It offers multiple measurement modes, including metric and imperial, and is especially handy for those who require versatility in their measuring tools, making it an excellent choice for both table saw alignment and other woodworking tasks.
How Can You Properly Calibrate a Dial Indicator for Precise Measurements?
Properly calibrating a dial indicator is essential for ensuring precise measurements, particularly when setting up tools like a table saw.
- Check the Zero Point: Before using a dial indicator, it is crucial to ensure that the dial reads zero when the probe is in contact with a flat surface or a known reference point.
- Use a Calibration Standard: Employ a calibration standard such as gauge blocks or a test bar to verify the accuracy of the dial indicator at various points along its range.
- Adjust the Indicator: If discrepancies are found during calibration, make the necessary adjustments to the dial indicator using its adjustment screw, ensuring it reads correctly at multiple points.
- Repeat Measurements: After adjustments, take multiple measurements on the calibration standard to confirm that the dial indicator consistently delivers accurate readings.
- Regular Maintenance: Periodically check and recalibrate the dial indicator, especially after significant use or if it has been dropped, to maintain its precision over time.
Check the Zero Point: To start calibration, place the dial indicator’s probe against a flat and stable surface. Adjust the dial until it reads zero, ensuring that any subsequent measurements will be accurate and consistent.
Use a Calibration Standard: A calibration standard helps provide a reference for verifying the dial indicator’s accuracy. By measuring known values with the indicator, you can determine if it performs correctly across its measurement range.
Adjust the Indicator: If your initial measurements reveal inaccuracies, use the adjustment screw on the back of the dial indicator to correct the readings. This step is vital for ensuring that the indicator will provide precise measurements when in use.
Repeat Measurements: After making adjustments, it’s essential to retest the dial indicator using the calibration standard. Take multiple readings to ensure that the adjustments have resolved any discrepancies and that the indicator is reliable.
Regular Maintenance: To keep your dial indicator in top working condition, perform regular checks and recalibrations. Keeping track of its performance will help you identify when it needs servicing to ensure continued accuracy in your measurements.
What Are the Best Practices for Using a Dial Indicator Effectively with a Table Saw?
Utilizing a dial indicator effectively with a table saw involves several best practices to ensure precision and accuracy.
- Proper Setup: Ensure that the dial indicator is securely mounted and calibrated before use. A stable setup minimizes vibrations and movement that could lead to inaccurate readings.
- Zeroing the Indicator: Always zero the dial indicator at the beginning of your measurement process. This ensures that any subsequent readings are relative to a known baseline, allowing for precise adjustments.
- Consistent Pressure: Apply consistent pressure when measuring with the dial indicator. Uneven pressure can cause the indicator to read inaccurately, leading to misalignments and errors in cuts.
- Regular Calibration: Frequently calibrate the dial indicator to maintain its accuracy over time. Environmental factors and wear can affect readings, so periodic checks are essential for maintaining performance.
- Measurement Techniques: Use the dial indicator to check various aspects of the table saw setup, such as blade alignment and fence parallelism. Understanding how to measure these components correctly will improve cut quality and overall safety.
- Documentation of Readings: Keep a log of dial indicator readings and adjustments made to the table saw. Documenting these changes helps track the saw’s performance over time and assists in identifying recurring issues.
- Safety Precautions: Always prioritize safety when using a dial indicator with a table saw. Ensure that the blade is not in motion during measurements and that proper protective gear is worn to prevent accidents.