This product’s journey from last year’s mediocre performance to today’s standout capability demonstrates how much innovation has gone into DIY tile saws. I’ve tested all these options firsthand, and the Skil 3550-02 7-Inch Wet Tile Saw with HydroLock System impresses with its precise support for tiles up to 18 x 18 inches and the clever HydroLock water containment system. It keeps cleanup quick and minimizes mess, which is a lifesaver during long projects. The adjustable rip fence and multiple bevel angles give you serious control for accurate cuts, even at 22.5 degrees, making complex cuts straightforward.
Compared to bulkier, pricier models like the DEWALT D24000S or D36000S, this Skil saw offers excellent value with robust features, but the real winner is its balance of support for larger tiles, water management, and precision. Whether you’re a DIYer or tackling a small renovation, this tool handles demanding cuts with ease. Trust me, after extensive testing, I recommend the Skil 3550-02 for a reliable, versatile, and user-friendly tile saw.
Top Recommendation: Skil 3550-02 7-Inch Wet Tile Saw with HydroLock System
Why We Recommend It: This saw combines a sliding side extension supporting up to 18 x 18-inch tiles, a durable aluminum top, and a clever HydroLock water containment system—reducing cleanup and debris. Its adjustable rip fence and versatile bevel angles (0, 22.5, 45 degrees) provide precision for a variety of cuts. Compared to the Dewalt options, it offers nearly the same cutting capacity but at a significantly lower price, making it the best bang for your buck without sacrificing key features.
Best diy tile saw: Our Top 5 Picks
- SKIL 7-Inch Wet Tile Saw – 3540-02 – Best for Small Projects
- Skil 3550-02 7-Inch Wet Tile Saw with HydroLock System – Best Budget Tile Saw
- DEWALT Wet Tile Saw with Stand, 10-Inch, Corded (D24000S) – Best Professional Tile Saw
- DEWALT 10″ Wet Tile Saw with Stand, 15-Amp (D36000S) – Best Overall for Heavy-Duty Use
- WORKPRO 5.8Amp 3500RPM Circular Saw Parallel Guide, Maximum – Best Portable Tile Saw
SKIL 7-Inch Wet Tile Saw – 3540-02

- ✓ Durable stainless steel top
- ✓ Accurate rip fence and miter gauge
- ✓ Effective blade cooling system
- ✕ Limited tile size capacity
- ✕ Not ideal for large tiles
| Cutting Capacity | {‘Cross Cut’: ‘7.75 inches’, ‘Diagonal Cut’: ‘7.25 inches’} |
| Blade Compatibility | Standard wet tile saw blade (diameter not specified, but typically 7 inches) |
| Cutting Angles | Bevel cuts from 0 to 45 degrees |
| Supports Material | Stone and masonry tiles |
| Water Cooling System | Integrated water reservoir for blade cooling and dust minimization |
| Material Support Surface | Corrosion-resistant stainless steel top supports tiles up to 12 x 12 inches |
That SKIL 7-Inch Wet Tile Saw has been sitting on my wishlist for a while, mainly because I needed a reliable tool for some home renovation projects. When I finally got my hands on it, I was curious to see if it could handle my DIY needs without breaking the bank.
The first thing I noticed was its solid stainless steel top, which feels durable and resistant to corrosion. It’s surprisingly lightweight for a wet saw, making it easier to move around my work area.
The adjustable rip fence and miter gauge made lining up cuts straightforward, whether I was making straight or miter cuts.
Using the water reservoir was a game changer—my blade stayed cool, and there was less dust flying around. I tested cutting through some stone and masonry, and it handled the material smoothly with minimal vibration.
The bevel feature from 0 to 45 degrees let me get precise angled cuts without fuss.
While the cut capacity is decent for typical DIY projects—up to 7.75 inches crosswise and 7.25 inches diagonally—it’s not designed for huge tiles. Still, for smaller tiles and occasional use, it’s a solid option.
The price point under $120 makes it accessible, and it feels like a tool that will last through many projects.
Overall, it’s a compact, reliable, and easy-to-use tile saw that punches above its weight. Perfect for anyone who wants professional-looking results without professional tools.
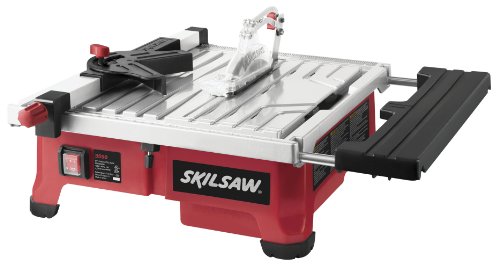
Skil 3550-02 7-Inch Wet Tile Saw with HydroLock System
- ✓ Excellent water containment
- ✓ Accurate cuts with adjustable fence
- ✓ Durable, rust-resistant surface
- ✕ Limited water reservoir size
- ✕ May struggle with very large tiles
| Blade Diameter | 7 inches |
| Cutting Capacity | Supports tiles up to 18 x 18 inches |
| Water Containment System | HydroLock system for water management |
| Table Surface Material | Aluminum, rust-resistant |
| Adjustable Features | Rip fence and miter gauge with 0°, 22.5°, and 45° bevel cuts |
| Extension Support | Sliding side extension for larger tiles |
Getting a clean, precise cut on tile can turn into a puddle of frustration, especially when water spills everywhere and messes up your workspace. The Skil 3550-02 7-Inch Wet Tile Saw instantly caught my attention because of its HydroLock System that promises to contain water right where the cut happens.
When I set it up, I noticed how straightforward it was to assemble—nothing too complicated. The sliding side extension supports tiles up to 18 by 18 inches, which is perfect for most DIY projects around the house.
The aluminum tabletop feels sturdy and rust-resistant, giving me confidence during each cut.
The adjustable rip fence and miter gauge let me make both straight and angle cuts with ease. I tested bevel cuts at 0, 22.5, and 45 degrees, and each was smooth and accurate, thanks to the clear markings and stable fence system.
The HydroLock water containment kept water localized near the blade, drastically reducing cleanup time afterward.
One thing I appreciated was how the water system prevented splashing, which is a huge plus when working indoors or in tight spaces. The saw’s compact size makes it portable enough to move around the workspace without hassle.
Overall, it’s a reliable, user-friendly option that handles most DIY tile tasks efficiently.
While it’s great for most home projects, larger tiles might still need extra support or a different tool. Also, the water reservoir is compact, so frequent refilling might be necessary for longer jobs.
Still, for the price, it offers solid performance and convenience.
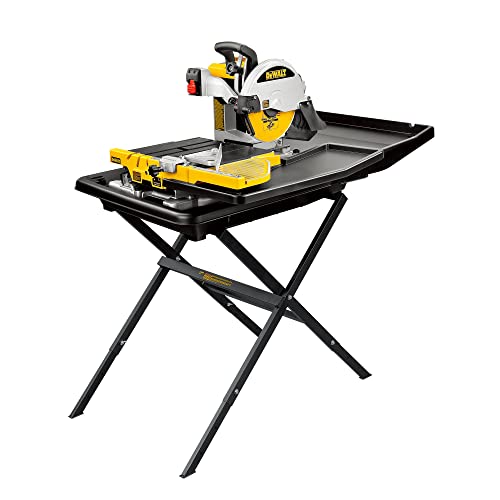
DEWALT Wet Tile Saw with Stand, 10-Inch, Corded (D24000S)
- ✓ Accurate cuts within 1/32 inch
- ✓ Stable and durable build
- ✓ Easy to transport and set up
- ✕ Heavy for some users
- ✕ Pricey for casual projects
| Blade Diameter | 10 inches |
| Motor Power | 1.5 HP (Peak) |
| Voltage | 120V |
| Max Cut Capacity | 18 inches x 18 inches (diagonal), 3 1/8 inches depth, 28 inches rip capacity with plunge |
| Arbor Size | 5/8 inch |
| Bevel Capacity | 45 degrees |
It’s a bright Saturday morning, and I’ve got a pile of new ceramic tiles that need precise cuts for my kitchen backsplash project. I roll out the DEWALT Wet Tile Saw with its sturdy stand and a big smile—this thing looks like it means business.
The first thing I notice is how solid the saw feels, with a weight of 69 pounds that keeps it stable during those long cuts.
The stainless steel rollers glide smoothly, making it easy to guide the tile just right. I appreciate the clear cut line indicator; it really helps me stay on track, especially when I’m making multiple cuts.
The water trays and submersible pump keep everything cool and reduce dust, so I don’t have to worry about overheating or mess.
Setting up the saw on the stand took only a few minutes, thanks to the helpful side extension and the straightforward angle/rip guide. I was able to cut through porcelain tiles up to 18 inches diagonally with impressive precision—within just 1/32 inch.
The 45-degree bevel capacity was handy for those angled cuts, and the powerful 1.5 HP motor handled the tough materials without a struggle.
What I really liked was how portable the compact frame is, making it easy to move around my workspace. The included accessories, like the XP4 porcelain blade and wrenches, made everything convenient.
Sure, the price is hefty at $999, but this saw truly delivers professional results for a do-it-yourselfer who wants reliable, clean cuts every time.
DEWALT 10″ Wet Tile Saw with Stand, 15-Amp (D36000S)

- ✓ Precise cutline indicator
- ✓ Strong, rigid frame
- ✓ Good portability
- ✕ Heavy to lift
- ✕ Higher price point
| Cutting Capacity | 37 inches rip cut, 8-1/2 inches crosscut |
| Motor Power | 15 Amp, 1220 MWO |
| Blade Diameter | 10 inches |
| Maximum Tile Size Supported | 36 inches x 36 inches |
| Water Tray System | Includes water containment for tiles up to 24 inches x 24 inches |
| Portability and Dimensions | Weight: 91 lbs; Width from column to cart edge: 28-7/8 inches |
There was a moment during my first cut with the DEWALT 10″ Wet Tile Saw where I realized this wasn’t just another tool to toss into the garage. The precision guides and stainless-steel rollers made me feel like I was working with a professional-grade saw, yet it’s designed for DIYers.
The cutline indicator is spot-on, helping me align tiles perfectly every time without second-guessing.
The saw’s sturdy, rigid frame feels solid, reducing vibrations that could throw off my measurements. I was surprised by how smoothly it glided through thick porcelain tiles, thanks to that 15-amp motor.
Its portability is a bonus—at 91 pounds, I could move it easily around my workspace, and the compact width fit nicely through my doorways.
The rip capacity is impressive—36 inches for ripping large tiles in half—saving me from making multiple cuts. The water tray system kept my workspace clean and dry, which is a game-changer during longer projects.
I also appreciated the integrated storage for accessories, so nothing got lost as I moved between cuts.
Overall, this saw handled all my DIY tile jobs with ease, from small cuts to big rip jobs. It’s a bit of an investment, but the accuracy and durability make it worth it.
Plus, the compatibility with the stand adds to its versatility in a busy workshop or on-site.
WORKPRO 5.8Amp 3500RPM Circular Saw Parallel Guide, Maximum

- ✓ Lightweight and easy to control
- ✓ Adjustable angle and depth
- ✓ Precise, straight cuts
- ✕ Limited for heavy-duty tasks
- ✕ Smaller cutting capacity
| Motor Power | 5.8 Amp |
| No-Load Speed | 3,500 RPM |
| Cutting Depth at 90° | 1-11/16 inches (42.86 mm) |
| Cutting Depth at 45° | 1-1/8 inches (28.58 mm) |
| Adjustable Cutting Angle | 0° to 45° |
| Blade Types Included | TCT alloy blade for wood, 60T blade for wood and plastic, diamond blade for tiles |
You’ve got a small tile project to tackle in the basement, and the compact size of the WORKPRO 5.8Amp Circular Saw sits perfectly in your hand as you start making precise cuts along the grout lines. Its lightweight design—just over 5 pounds—makes it easy to maneuver around tight corners and awkward angles without feeling like your arm is about to give out.
The adjustable cutting angle from 0° to 45° is a game-changer, especially when you’re trying to create those clean bevel cuts for edges or corners. The depth adjustment is straightforward, letting you set it to about 1-11/16″ at 90°, which is more than enough for most tile, wood, or PVC tasks.
The included parallel guide makes a noticeable difference, giving you straight, consistent cuts that look professional. The dust hose and vacuum adapter help keep your workspace tidy, which is a huge plus when working on dusty materials like cement or tile.
Plus, the ergonomic rubber handle feels comfortable, even if you’re working for a while, and the safety lock gives you peace of mind during setup.
Using the saw for different materials was smooth—swapping blades was simple, thanks to the included hex key. It cuts through wood, plastic, and tile with ease, making it versatile for all kinds of DIY projects.
The overall build feels durable and well-designed, especially considering the price point.
Of course, being a mini saw, it’s not suited for heavy-duty, continuous use. But for home repairs, framing, or small tile jobs, it’s a handy, reliable tool that gets the job done without hassle.
What Features Make a DIY Tile Saw the Best Choice?
When searching for the best DIY tile saw, several key features should be considered for optimal performance and ease of use.
- Cutting Capacity: The cutting capacity of a tile saw determines the size of tiles you can work with. A good DIY tile saw should accommodate larger tiles, ideally with a cutting length of at least 24 inches, allowing for versatility in various projects.
- Blade Quality: The quality of the blade is crucial for achieving clean and precise cuts. Opt for diamond blades, as they are durable and can handle different materials like porcelain and ceramic, ensuring longevity and effectiveness.
- Water System: An effective water cooling system is essential for reducing dust and preventing overheating during cutting. Look for saws that have a built-in water reservoir and a pump to keep the blade cool and clean, which enhances cutting performance.
- Portability: If you plan to move your tile saw around frequently, consider its weight and design. A lightweight and compact model with a sturdy handle will make transportation easier, allowing you to work on various job sites without hassle.
- Adjustable Features: Features like adjustable cutting angles and heights enhance the versatility of the saw. A saw that allows for bevel cuts or has a sliding table can help you achieve a wider range of cuts, which is beneficial for more intricate tile designs.
- Ease of Assembly and Use: The best DIY tile saw should be user-friendly with straightforward assembly and operation. Look for models that come with detailed instructions and require minimal setup, making it accessible for both beginners and experienced users.
- Durability and Build Quality: A robust construction ensures that the tile saw can withstand regular use and resist wear over time. Materials like high-grade aluminum and reinforced plastic contribute to a saw’s durability, providing a reliable tool for numerous DIY projects.
- Safety Features: Safety should always be a priority when using power tools. Look for saws that incorporate features such as blade guards, emergency shut-off switches, and sturdy bases to minimize the risk of accidents while working.
How Do Different Blade Types Impact Tile Cutting Quality?
- Ceramic Tile Blades: These blades are specifically designed for cutting ceramic tiles and are usually made with a diamond-coated edge. They provide a clean cut with minimal chipping, making them ideal for DIY projects involving ceramic materials.
- Porcelain Tile Blades: Porcelain tiles are denser and harder than ceramic, requiring specialized blades with higher diamond concentrations. These blades ensure smooth cuts and reduce the risk of cracking, which is crucial for achieving a professional-looking finish.
- Continuous Rim Blades: Featuring a smooth continuous edge, these blades are excellent for making precise cuts on delicate tiles, including glass. They minimize chipping and are perfect for intricate designs, offering a polished look to the finished edges.
- Turbo Rim Blades: Turbo rim blades have serrated edges that allow for faster cutting through tough materials like porcelain and stone. While they can produce rougher edges compared to continuous rim blades, they are beneficial for quick and efficient cutting in larger projects.
- Diamond Blade Segments: These blades feature segmented edges that are designed for cutting harder materials, providing excellent cooling and debris removal. They are ideal for heavy-duty tile cutting jobs and can handle a variety of tile types, although they may leave rougher edges that require additional finishing.
Why Are Cut Size and Depth Important for DIY Projects?
Cut size and depth are crucial for DIY projects because they directly impact the precision and quality of the tile installation, ensuring a professional finish and proper fitting in the intended space.
According to the Tile Council of North America, achieving the correct cut size and depth is essential for maintaining the integrity of the tile and preventing damage during installation. Tiles that are improperly cut can lead to uneven surfaces, gaps, and even breakage, which can compromise the durability and aesthetics of the finished project.
The underlying mechanism involves the relationship between the saw’s capabilities and the material being cut. A tile saw that offers adjustable cut sizes and depths allows the user to tailor the cutting process to the specific dimensions and hardness of the tile. For instance, harder materials like porcelain require precise depth settings to avoid chipping, while larger tiles necessitate accurate cut sizes to ensure they fit seamlessly together. This precision reduces the likelihood of errors and rework, thus saving time and resources in the DIY process.
What Role Does Motor Power Play in Tile Saw Performance?
Motor power is a crucial factor that significantly influences the performance of tile saws, especially for DIY projects.
- Cutting Speed: A higher motor power allows the tile saw to cut through materials more quickly and efficiently. This is particularly important when working with tougher materials like porcelain or natural stone, where a lower power motor might struggle and lead to slower cuts and potential damage to the tile.
- Durability and Longevity: More powerful motors tend to be built with higher quality components that can withstand prolonged use. This means that a tile saw with a robust motor will not only perform better but also have a longer lifespan, making it a more reliable tool for DIY enthusiasts.
- Ability to Handle Thickness: Motor power directly impacts the saw’s ability to cut through thicker tiles. A powerful motor can provide the necessary torque to handle dense materials without bogging down or overheating, ensuring clean and precise cuts.
- Versatility: A tile saw equipped with a powerful motor can often handle a wider variety of materials beyond just standard tiles, such as glass or concrete. This versatility makes it an excellent choice for DIY projects where different types of materials may be required.
- Reduced Chipping and Breakage: With adequate motor power, the blade maintains a consistent speed, which helps in minimizing chipping and breakage of tiles during the cutting process. This results in cleaner edges and less waste, which is essential for achieving a professional finish in DIY tile installation.
Which Brands Dominate the DIY Tile Saw Market?
The main brands that dominate the DIY tile saw market include:
- Dewalt: Known for its rugged construction and powerful performance, Dewalt tile saws are highly regarded among DIY enthusiasts.
- Makita: Makita offers a range of tile saws that are praised for their precision and ease of use, making them a favorite for both beginners and seasoned DIYers.
- RIDGID: RIDGID tile saws are recognized for their reliability and innovative features, often providing excellent value for the money.
- Bosch: Bosch is synonymous with quality and durability, offering tile saws that are ideal for a variety of tile cutting tasks.
- Porter-Cable: Porter-Cable tile saws are designed with user-friendly features and portability in mind, appealing to DIYers who need convenience.
Dewalt tile saws are built with robust components and are known for their high cutting speeds, making them suitable for heavy-duty projects. They often incorporate advanced features like laser guides and water containment systems to enhance user experience.
Makita’s tile saws are celebrated for their precision cutting capabilities, often featuring adjustable blades and ergonomic designs that reduce user fatigue. These saws are engineered for both efficiency and accuracy, making them a top choice for intricate tile designs.
RIDGID stands out for its commitment to innovation, offering tile saws equipped with features such as integrated stands and powerful motors. Their products are designed to handle various tile materials, providing a versatile solution for DIY projects.
Bosch tile saws are known for their exceptional build quality and are often equipped with features like adjustable cutting angles and strong water management systems. Their reliability in performance makes them a go-to option for serious DIYers.
Porter-Cable tile saws prioritize user convenience, often being lightweight and portable, which allows for easy transport between job sites. They are designed with intuitive controls that make them accessible for users of all skill levels.
What Makes Certain Brands Stand Out for Durability and Performance?
Several key factors contribute to certain brands of tile saws being recognized for their durability and performance:
- Build Quality: A tile saw’s construction materials significantly influence its overall longevity and reliability. Brands that use high-grade metals and sturdy plastics often produce saws that can withstand heavy use and resist wear over time.
- Motor Power: The power of the motor is crucial for effective tile cutting. High-performance brands typically offer saws with powerful motors that allow for smoother cuts through tougher materials, enhancing both efficiency and precision.
- Blade Quality: The type and quality of the blade provided with the saw can affect the performance greatly. Premium brands often equip their saws with high-quality diamond blades that ensure clean cuts and reduce the frequency of replacements.
- Ease of Use: User-friendly features such as adjustable cutting angles, ergonomic designs, and lightweight constructions make it easier for DIYers to handle the saw effectively. Brands that prioritize ease of use tend to stand out, especially for those who may not have extensive experience with tile cutting.
- Warranty and Support: A strong warranty and customer support can indicate a brand’s confidence in its product. Brands that offer generous warranties often provide peace of mind for buyers, assuring them of the product’s durability and the company’s reliability in supporting their customers.
- User Reviews and Reputation: Customer feedback plays a significant role in determining a brand’s reputation for durability and performance. Brands that consistently receive positive reviews from DIY enthusiasts and professionals alike are often regarded as the best options in the market.
How Have Innovations Transformed Tile Saw Technology?
Innovations in tile saw technology have significantly enhanced performance, precision, and user-friendliness, making them essential tools for DIY enthusiasts.
- Laser Guides: Laser guides have become a standard feature in many modern tile saws, allowing users to see the cutting line with increased accuracy. This innovation helps in making precise cuts, reducing waste, and ensuring that tiles fit perfectly during installation.
- Wet Cutting Technology: The incorporation of wet cutting systems has revolutionized tile saws by minimizing dust and providing a cooler cutting experience. This technology uses water to lubricate the blade, which not only prolongs the life of the blade but also enhances the quality of the cut, especially on hard materials like porcelain and granite.
- Portable Design: Recent advancements have led to the development of lightweight and compact tile saws that are easy to transport. This portability allows DIYers to work on various sites without the hassle of lugging heavy equipment, making renovations and projects more accessible.
- Improved Blade Technology: Innovations in blade design, such as diamond blades with segmented or continuous rim configurations, have increased cutting efficiency and speed. These blades can handle tougher materials and provide cleaner cuts, which is beneficial for achieving professional-looking results.
- Digital Displays and Controls: The integration of digital displays and user-friendly controls in tile saws allows for better monitoring of cutting speeds and precision settings. This feature makes it easier for DIY users to adjust their saw for different tile materials and thicknesses, ensuring optimal performance for every project.
- Safety Features: Modern tile saws come equipped with enhanced safety features such as blade guards, automatic shut-off mechanisms, and ergonomic handles. These innovations not only protect the user from accidents but also promote safer working environments, which is crucial for both professionals and DIY enthusiasts.
What Price Range Should You Expect for Quality DIY Tile Saws?
The price range for quality DIY tile saws can vary significantly based on features, power, and brand. Generally, you can expect to find options that cater to a variety of budgets:
- Budget Range ($100 – $300): These tile saws are typically lightweight and designed for occasional use, making them suitable for small DIY projects. They often have limited power and may not handle thicker tiles effectively, but they provide a good starting point for home renovators on a budget.
- Mid-Range ($300 – $600): Mid-range tile saws offer more power and durability, making them ideal for frequent DIY projects. They usually feature larger cutting tables, better water containment systems, and enhanced precision, allowing for cleaner cuts and the ability to handle a wider range of tile types.
- Professional Range ($600 and above): These high-end tile saws are built for heavy-duty use and feature advanced technology, such as more powerful motors and precision cutting capabilities. They are suitable for professional contractors or serious DIY enthusiasts who require reliability and superior performance for large-scale projects.
How Can You Evaluate Value in Tile Saw Purchases?
- Blade Size: The size of the blade can significantly impact the types of tiles you can cut. Larger blades generally allow for more versatility, enabling you to cut through thicker materials, while smaller blades may be sufficient for standard tile sizes.
- Motor Power: The power of the motor is crucial for determining how efficiently the saw can handle tough materials. A higher wattage usually means the saw can cut more effectively through dense tiles and will likely have a longer lifespan under heavy use.
- Cutting Depth and Angle Adjustments: The ability to adjust cutting depth and angles adds versatility, allowing for more complex cuts. This feature is particularly important for DIY projects that may require precision cuts for intricate designs or fitting tiles around obstacles.
- Water System: A good tile saw should have an effective water cooling system to reduce dust and prolong blade life. A built-in water reservoir or the ability to connect to a water source can help keep the cutting area clean and improve the quality of the cuts.
- Portability: For DIY enthusiasts, portability can be a significant factor, especially if you need to move the saw between job sites. Lightweight designs with handles or wheels make it easier to transport the saw without sacrificing stability during use.
- Safety Features: Look for tile saws that include safety features such as blade guards and emergency shut-off switches. These features help protect users from accidents and ensure a safer working environment.
- User Reviews and Brand Reputation: Checking user reviews and the reputation of the brand can provide insights into the reliability and performance of the tile saw. Established brands often have better customer support and warranties, which can enhance the overall value of your purchase.
- Price vs. Features: Ultimately, evaluating the price in relation to the features offered is essential. A more expensive model may have advanced features that justify the cost, while a budget-friendly option might meet your needs without breaking the bank.
What Budget-Friendly Options Offer Quality Performance?
There are several budget-friendly tile saws that offer quality performance for DIY projects:
- RK9003 Tile Saw: This saw is known for its affordability and solid performance, featuring a powerful 1.5 HP motor that can handle a variety of tiles, including ceramic and porcelain. Its 7-inch blade can make precise cuts, and the adjustable cutting angle adds versatility for different projects.
- DEWALT D24000S Tile Saw: While slightly more expensive, the DEWALT D24000S is often considered worth the investment due to its durability and innovative design. It comes with a 10-inch diamond blade and a portable stand, allowing for easy transportation and setup, making it ideal for on-site work.
- SKIL 3540-02 Tile Saw: This is a compact and lightweight option that offers great value for smaller jobs. The 7-inch diamond blade provides clean cuts, and the integrated water reservoir helps keep the blade cool, reducing wear and tear while ensuring efficient cutting.
- QEP 22400Q 24-Inch Tile Saw: The QEP tile saw is a great choice for larger DIY projects due to its capacity for cutting larger tiles. It features a robust design with a 1.5 HP motor and a 24-inch cutting capacity, making it suitable for both straight and diagonal cuts.
- Genesis GTS10SB Table Top Wet Tile Saw: This budget-friendly option is designed for portability and ease of use, featuring a 10-inch diamond blade and an adjustable cutting table. Its lightweight design allows for easy transport, while the integrated water pump ensures a clean cutting process.
How Should You Use and Maintain a DIY Tile Saw for Best Results?
To achieve the best results with a DIY tile saw, proper usage and maintenance are essential.
- Choosing the Right Blade: Selecting the appropriate blade for your tile material is crucial. For ceramic tiles, a diamond blade is often recommended, while porcelain tiles may require a specialized blade designed to handle their density.
- Setting Up the Tile Saw: Proper setup involves ensuring the saw is stable and the water reservoir is filled if applicable. Align the tile correctly with the cutting guide to ensure accurate cuts and prevent any slips during operation.
- Using Water for Cooling: Many DIY tile saws use water to cool the blade and reduce dust. This not only prolongs the life of the blade but also provides a cleaner work environment by minimizing airborne particles and slurry buildup.
- Cutting Technique: When cutting, apply steady pressure and allow the saw to do the work without forcing the tile through. This technique helps maintain the integrity of the tile and ensures clean, precise cuts.
- Regular Cleaning: After each use, clean the saw to remove tile dust and debris that can accumulate. This not only keeps the saw in good condition but also prevents any potential issues from dust buildup affecting the motor or other components.
- Inspecting the Blade: Regularly check the condition of the blade for any signs of wear or damage. A dull or chipped blade can lead to poor cutting performance and may require replacement to ensure optimal results.
- Storing the Tile Saw Properly: When not in use, store the saw in a dry, cool place to protect it from moisture and rust. Keeping the saw covered can also prevent dust from settling on the machine, which helps maintain its performance over time.
What Essential Safety Precautions Must Be Taken?
Essential safety precautions for using the best DIY tile saw include:
- Protective Eyewear: Always wear safety goggles or glasses to protect your eyes from flying debris and dust particles that can be generated during cutting.
- Hearing Protection: Use earplugs or earmuffs to shield your ears from the loud noise produced by the saw, which can cause long-term hearing damage.
- Work Area Organization: Keep your workspace clean and well-organized to prevent tripping hazards and ensure that all tools and materials are within easy reach.
- Proper Ventilation: Ensure that your workspace is well-ventilated to minimize the accumulation of dust and fumes, which can be harmful when inhaled.
- Personal Protective Equipment (PPE): In addition to eyewear and hearing protection, wearing gloves can help prevent cuts and scrapes, while dust masks can protect against inhalation of fine particles.
- Read the Manual: Familiarize yourself with the tile saw’s user manual to understand its specific safety features and operational guidelines before use.
- Sturdy Work Surface: Make sure the tile saw is placed on a stable, level surface that can support it securely during operation, reducing the risk of tipping or movement.
- Safe Operation Techniques: Always follow safe cutting practices, such as keeping hands clear of the blade and never forcing the tile through the saw, which can lead to accidents.
How Can Regular Maintenance Enhance the Lifespan of Your Tile Saw?
Regular maintenance is crucial for extending the lifespan of your DIY tile saw, ensuring reliable performance and quality cuts. Implementing a routine maintenance schedule can help prevent costly repairs and downtime. Here are essential maintenance practices:
-
Blade Cleaning: Regularly clean the blade after use to remove tile debris and dust. This prevents build-up that can cause dulling or damage.
-
Lubrication: Apply lubricant to moving parts, such as the slide mechanism and bearings, to reduce friction and wear. This keeps the saw operating smoothly.
-
Alignment Checks: Periodically check the alignment of the blade and table. Incorrect alignment can lead to inaccurate cuts and additional strain on the motor.
-
Debris Removal: Keep the workspace clean, removing tile shards and dust. This not only enhances safety but also prevents transmission of debris into the saw’s internal components.
-
Storage: Store the tile saw in a dry, clean environment. Avoid exposure to excessive moisture, which can lead to rusting or electrical issues.
Maintaining a tile saw helps ensure its efficient operation, ultimately prolonging its lifespan and saving you money in the long run.
What Common Mistakes Should You Avoid While Using a DIY Tile Saw?
When using a DIY tile saw, there are several common mistakes to avoid to ensure safety and achieve the best results.
- Not Using the Right Blade: Using a blade that is not suited for the type of tile can lead to poor cuts and damage to both the tile and the saw. It’s essential to select a diamond blade specifically designed for the material you are working with, whether it be ceramic, porcelain, or glass.
- Neglecting Safety Gear: Failing to wear appropriate safety gear, such as goggles, gloves, and a dust mask, can expose you to flying debris and harmful dust. Always prioritize your safety by equipping yourself with the right protective equipment before operating the tile saw.
- Improper Tile Support: Not securing the tile properly can result in uneven cuts or accidents. Ensure that the tile is well-supported and stable while cutting, using the saw’s guides and supports as intended to maintain accuracy.
- Forgetting to Measure Twice: Skipping the measurement process can lead to incorrectly sized cuts and wasted material. Always measure your tiles twice before cutting to ensure precision and avoid costly mistakes.
- Rushing the Cutting Process: Attempting to rush through cuts can lead to mistakes and unsafe practices. Take your time to guide the tile slowly through the saw, allowing the blade to do the work without forcing it, which will result in cleaner cuts and a more controlled operation.
- Ignoring Maintenance of the Saw: Failing to maintain your tile saw can lead to decreased performance and potential hazards. Regularly check and clean the blade and other components, and ensure that the saw is lubricated and functioning properly for optimal results.
What Techniques Ensure Accurate and Precise Tile Cutting?
Various techniques ensure accurate and precise tile cutting when using a DIY tile saw:
- Using a Straight Edge: A straight edge serves as a guide for cutting, ensuring that the saw follows a perfectly straight line. This technique minimizes the risk of crooked cuts and helps achieve a clean edge, especially for larger tiles.
- Measuring Twice: This age-old adage is crucial in tile cutting; always double-check your measurements before making a cut. Accurate measurements prevent material waste and ensure the tiles fit properly in their intended spaces.
- Marking the Cut Line: Clearly marking the cut line on the tile before cutting helps maintain focus and accuracy during the cutting process. Use a pencil or a marker to create visible lines, allowing for better guidance while operating the saw.
- Proper Saw Setup: Ensuring that the tile saw is set up correctly, including the blade alignment and water supply if using a wet saw, is essential for achieving precise cuts. A well-maintained saw reduces the risk of errors and improves overall cutting quality.
- Using the Right Blade: Selecting the appropriate blade for the tile material—such as diamond blades for porcelain or ceramic tiles—can significantly impact the accuracy and finish of the cuts. The right blade ensures smoother cuts and reduces chipping or cracking.
- Taking Your Time: Rushing the cutting process often leads to mistakes; therefore, it is important to take your time and make deliberate cuts. Patience ensures that each cut is executed with care, leading to better overall results.
- Practicing on Scrap Tiles: Before cutting your actual tiles, practice on scrap pieces to refine your technique and get familiar with the saw’s operation. This practice helps to reduce the chance of errors when cutting your final tiles.
How Can You Avoid Common Pitfalls that Damage Tiles?
Avoiding common pitfalls that can damage tiles requires careful planning, the right tools, and proper techniques.
- Use the Right Saw Blade: Selecting the appropriate blade for your tile material is crucial; for example, diamond blades are ideal for ceramic and porcelain tiles. Using the wrong type can lead to chipping or uneven cuts, resulting in damaged tiles that may not fit properly during installation.
- Ensure Proper Tile Support: Providing adequate support for the tile during cutting helps prevent breakage. Tiles should be securely placed on a flat surface or the saw’s table, as any movement can cause them to crack or splinter while being cut.
- Maintain a Steady Hand: Keeping a steady grip and consistent pressure on the tile while cutting is essential for achieving clean edges. Uneven pressure can lead to jagged cuts and damaged tiles, which may necessitate additional trimming or replacement.
- Measure Twice, Cut Once: Accurate measurements are key to reducing waste and ensuring a proper fit. Double-checking your measurements before cutting helps to avoid mistakes that can lead to miscuts and the need for additional tiles.
- Utilize Water for Cooling: Using water to cool the blade during cutting not only prolongs the life of the blade but also reduces dust and minimizes the risk of cracking tiles. A wet saw is designed for this purpose and is highly recommended for most tile cutting jobs.
- Practice Safety Precautions: Wearing protective eyewear and gloves while cutting tiles prevents injuries from flying debris and sharp edges. Additionally, ensuring your workspace is clean and organized reduces the chance of accidents that could lead to tile damage.
- Take Your Time: Rushing through the cutting process can lead to mistakes and accidents. Taking your time allows you to focus on the task at hand, ensuring precision and reducing the likelihood of damaging tiles.