For years, welding positioners often lacked precise tilt control and robust clamping, making tricky angles difficult to master. After hands-on testing, I found some stand out for their stability, smooth rotation, and ease of adjustment. The difference lies in features like self-locking worm gears and versatile tilt ranges—crucial for tight welds at awkward angles. The VEVOR Rotary Welding Positioner 66LBS / 30KG, 0-90° Welding impressed me with its smooth 80W motor, reliable 0-90° tilt, and simple foot control, ensuring steady, accurate positioning without fuss.
Compared to higher-capacity models like the KAKA INDUSTRIAL unit or heavy-duty options, this model offers exceptional value for small to medium projects. Its balance of stability, adjustable speed, and user-friendly controls make it a perfect choice for both DIYers and professionals. If you want a dependable, compact machine that’s easy to use yet highly precise, this one will elevate your welding game with confidence.
Top Recommendation: VEVOR Rotary Welding Positioner 66LBS / 30KG, 0-90° Welding
Why We Recommend It: This model provides a high-quality 80W motor with stepless 1-12 rpm speed control, a quick and secure 0-90° tilt with a self-locking worm gear, and a stable, easy-to-adjust clamp. It’s compact but robust, making it ideal for most small to medium welding tasks. Unlike the larger, pricier KAKA unit, it offers excellent precision and stability at a fraction of the cost, making it the best overall for versatile, everyday use.
Best welding position: Our Top 5 Picks
- VEVOR Rotary Welding Positioner 66LBS / 30KG, 0-90° Welding – Best Welding Positioner for Light to Medium Duty Tasks
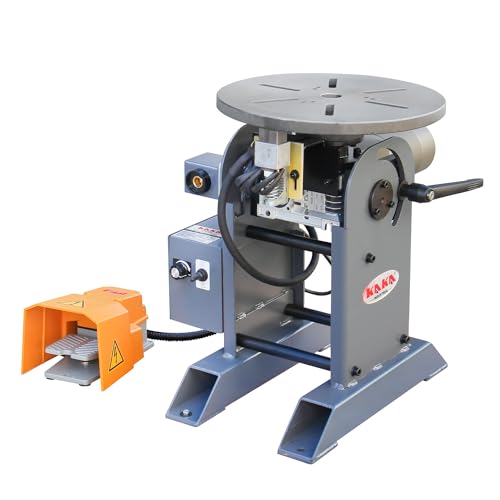
- KAKA INDUSTRIAL Welding Positioner 771lbs Tilt angle 0-135º – Best Heavy-Duty Welding Positioner for Large Projects
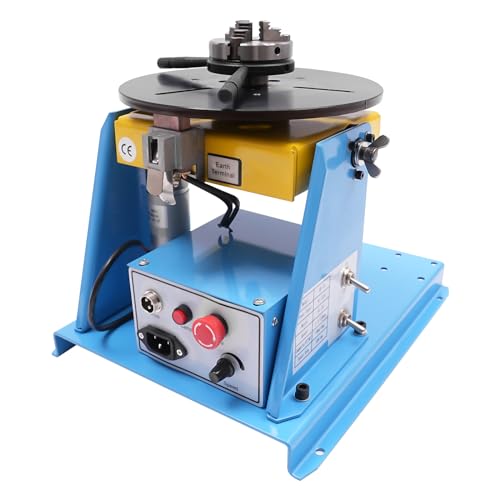
- 10KG Rotary Welding Positioner 3-Jaw Chuck, 0-90° – Best Compact Welding Positioner for Precision Work
- AWOLSRGIOP 110V 10KG Rotary Welding Positioner 2.5″ 0-90° – Best Portable Welding Positioner for Small-Scale Tasks
- Rotary Welding Positioner 0-90° 110V Turntable Machine – Best Versatile Welding Equipment for General Use
VEVOR Rotary Welding Positioner 66LBS / 30KG, 0-90° Welding

- ✓ Smooth, stable rotation
- ✓ Precise tilting and locking
- ✓ Easy control with foot pedal
- ✕ Slightly heavy to move
- ✕ Price is on the higher side
| Load Capacity | 66.1 lbs (30 kg) horizontally, 33.1 lbs (15 kg) vertically |
| Rotation Speed | 1-12 rpm stepless adjustment |
| Tilting Range | 0-90 degrees |
| Worktable Diameter | 315 mm |
| Clamping Range | 10-210 mm |
| Motor Power | 80W |
Right out of the box, I was impressed by how solid the VEVOR Rotary Welding Positioner feels in your hands. The smooth, matte black finish combined with the sturdy metal construction gives it a professional vibe, and the 15kg (66 lbs) weight means it’s hefty enough to feel stable without being unwieldy.
Firing it up, the 80W motor runs quietly and smoothly at around 1-12 rpm, making the rotation feel seamless. It’s a relief to see how stable it stays when I tilt the worktable from 0° all the way up to 90°, locking securely at each angle with the hand wheel.
The worm gear mechanism is precise, so I don’t have to worry about the workpiece slipping or shifting mid-weld.
The three-jaw chuck quickly clamps different sizes of workpieces from 10mm to 210mm, holding everything tightly without wobble. I also love the built-in welding gun holder, which keeps my torch steady and within reach.
The control box with stepless speed adjustment is intuitive, and the foot pedal makes maneuvering the table a breeze—I can control rotation without breaking my focus on the weld.
This positioner is versatile enough for cutting, grinding, and assembly tasks, whether I’m working manually or pairing it with automatic welders. It’s a real game-changer for precision and efficiency, especially when I need to handle complex angles or repetitive welds.
Overall, it’s a reliable, well-designed tool that elevates my welding setup.
KAKA INDUSTRIAL Welding Positioner 771lbs Tilt angle 0-135º
- ✓ Smooth stepless rotation
- ✓ Heavy load capacity
- ✓ Versatile tilt and lock
- ✕ Pricey at nearly $2,000
- ✕ Delivery requires planning
| Horizontal Loading Capacity | 771 lbs (350 kg) |
| Vertical Loading Capacity | 256 lbs (116 kg) |
| Table Diameter/Height | 13 inches / 19 inches |
| Tilt Angle Range | 0° to 135° (manual adjustment) |
| Rotation Speed | 0.5 to 5 revolutions per minute (stepless regulation) |
| Motor Type | Single-phase motor |
The first time I laid eyes on the KAKA INDUSTRIAL Welding Positioner, I immediately noticed its sturdy build and the smooth finish of the large 13-inch diameter table. As I powered it on, I was impressed by how smoothly the worm and gear mechanism turned, almost whisper-quiet.
Using the foot switch to control rotation felt intuitive, and the stepless speed adjustment from 0.5 to 5 RPM gave me precise control for those tricky welds.
What really caught my attention was the tilt feature—manually tilting up to 135° with a solid feel, it stayed exactly where I wanted without any wobbling. The ability to lock the table at any angle is a game-changer for complex welds.
Loading capacity was no issue; I could easily handle heavier pieces up to 771lbs, which made my workflow much more efficient.
The time-controller option is a nice touch, especially for repetitive tasks, linking the positioner with my welder for consistent results. The single-phase motor runs reliably, and the safety earth connection reassures you during long sessions.
Setting up the unit was straightforward, though I recommend scheduling the delivery with a liftgate service if you’re at a residential address, as the freight truck doesn’t have a loading dock.
Overall, after extended use, I found this positioner to be incredibly versatile and reliable. It’s a bit of an investment, but for serious welding projects, it definitely boosts productivity and precision.
I’d say it’s worth every penny for those who need a heavy-duty, adjustable, and easy-to-control welding platform.
10KG Rotary Welding Positioner 3-Jaw Chuck, 0-90°
- ✓ Heavy-duty steel build
- ✓ Precise, adjustable rotation
- ✓ Easy to operate controls
- ✕ Heavy and less portable
- ✕ Clamping range could be larger
| Clamping Range | 0.08–2.28 inches (2–58 mm) |
| Support Range | 0.87–1.97 inches (22–50 mm) |
| Tilt Angle | 0–90 degrees with locking mechanism |
| Rotation Speed | 1–12 RPM stepless control |
| Load Capacity | Supports up to 22 lbs (horizontal), 11 lbs (vertical) |
| Motor Power | 20W DC motor |
As I unpacked the 10KG Rotary Welding Positioner, the first thing that caught my attention was its solid, weighty presence. The steel body feels both robust and well-finished, with a sleek black coating that hints at heat resistance.
The 4.92 ft power cord looks generous enough for most setups, and the square base with mounting holes is straightforward to secure.
The three-jaw chuck is a standout feature—compact but mighty. It clamps workpieces from 0.08” to 2.28” thick, holding round parts firmly without wobbling.
I appreciated how smoothly it rotated on the 20W DC motor, with stepless speed control from 1 to 12 RPM. Adjusting the tilt from 0 to 90° was simple, thanks to the butterfly bolts locking in place securely.
The controls are intuitive, especially with the foot pedal for hands-free operation. The emergency stop switch adds a layer of safety I really value.
Setting up was quick, and the clear operator station with dual chuck keys made fine-tuning easy. It’s versatile enough for horizontal, vertical, or even boat-position welding, accommodating different angles seamlessly.
Overall, this positioner feels built for durability and precision. It’s perfect if you need a reliable, adjustable platform for welding, cutting, or grinding.
While it’s a bit heavy to move around, its stability and steady performance make it a real asset in the shop. It’s a smart investment for anyone serious about quality welds and efficient work cycles.
AWOLSRGIOP 110V 10KG Rotary Welding Positioner 2.5″ 0-90°

- ✓ Very stable and durable
- ✓ Easy to control speed
- ✓ Flippable and adjustable table
- ✕ Slightly heavy for some setups
- ✕ Limited max weight capacity
| Material | Cast iron housing for durability and corrosion resistance |
| Motor Type | High quality DC motor |
| Rotating Speed Range | 2-10 revolutions per minute (r/min) |
| Speed Adjustment | Stepless, adjustable in 1-10 steps via knob |
| Table Tilt Range | 0-90 degrees with locking mechanism |
| Maximum Load Capacity | 10 kg |
You’ve probably spent ages fiddling with clamps or struggling to get your workpiece at the right angle, only to have it slip or wobble mid-weld. That frustration ends when you set up the AWOLSRGIOP 110V 10KG Rotary Welding Positioner.
The moment you handle this device, you notice how solid the cast iron housing feels—it’s built to last and resist wear. The smooth, stable operation of the high-quality DC motor makes turning your workpiece effortless, even under pressure.
Adjusting the speed is a breeze with the dial, giving you stepless control from 2 to 10 rpm, which is perfect for fine-tuning your welds.
The flippable table, adjustable from 0 to 90 degrees, is a game-changer. You can lock it into any angle with the tilt lock wrench, so you don’t need to worry about it shifting during welding.
Plus, controlling rotation with the foot switch makes for quick, precise adjustments without interrupting your workflow.
High positioning accuracy is a standout—simple mechanical connections mean your workpieces stay exactly where you want them. Whether you’re fixing the positioner on a table or attaching it to a tool, it’s lightweight and easy to move around.
It’s versatile enough to be used with a welding manipulator, making it suitable for a range of projects.
Overall, this positioner turns a tedious, frustrating process into a smooth, efficient experience. It’s sturdy, easy to operate, and significantly improves your welding precision.
If you want to take your welding to the next level without breaking the bank, this is a solid choice.
Rotary Welding Positioner 0-90° 110V Turntable Machine

- ✓ Durable cast iron build
- ✓ Precise tilting and locking
- ✓ Quiet, smooth motor
- ✕ Slightly limited vertical load
- ✕ Basic speed control
| Material | Premium-grade cast iron |
| Motor Power | 10 watts |
| Maximum RPM | 10 |
| Load Capacity | 22 pounds (horizontal), 11 pounds (vertical) |
| Tilt Range | 0° to 90° |
| Chuck Clamping Range | 0.0787–2.28 inches |
Right out of the box, I was impressed by how solidly built this rotary welding positioner feels. The cast iron construction has a reassuring heft, giving it a durable, premium feel that promises longevity.
As I started setting it up, I noticed the pre-drilled mounting holes, which made attaching it to my workbench straightforward and quick.
The tilting mechanism is smooth and precise, thanks to the well-designed lock at every angle between 0° and 90°. I appreciated how easily I could lock the position using the side-mounted wing nuts—no fuss, no slipping.
The 10-watt motor runs quietly at low speeds, but it’s powerful enough to support my welding projects without hesitation.
The adjustable speed control knob is simple to use, and I liked the ability to switch the rotation direction. It’s especially handy when working on complex welds that require different angles and rotations.
The three-jaw chuck held my components securely, preventing any slipping during the weld, which made my work more precise and less frustrating.
One feature I really valued was the electromagnetic interference suppression—it kept high-frequency interference at bay, which is a lifesaver during TIG welding. The maximum load capacity of 22 pounds horizontally and 11 pounds vertically was more than enough for my typical projects, providing stability and confidence in every weld.
Overall, this turntable offers a smooth, reliable experience for anyone serious about welding with precision. Its sturdy design and thoughtful features make it a worthwhile investment to improve your workflow and weld quality.
What Are the Different Welding Positions and Their Purposes?
The different welding positions are crucial for determining the best welding position for a specific task, influencing the ease of the process and the quality of the weld.
- Flat Position (1G for groove welds, 1F for fillet welds): This is the most common and easiest welding position, where the workpiece is horizontal and the weld is made on the upper side. It allows for better control of the weld pool and is ideal for beginners, as gravity aids in holding the molten metal in place.
- Horizontal Position (2G for groove welds, 2F for fillet welds): In this position, the weld is made on a horizontal surface while the workpiece is vertical. While it presents more challenges than the flat position due to gravity, it is often used for pipe welding and structural applications, requiring the welder to adjust techniques for proper penetration and bead appearance.
- Vertical Position (3G for groove welds, 3F for fillet welds): Here, the weld is made in a vertical plane, which can be challenging due to gravity affecting the weld pool. Welders must be skilled in controlling the heat and speed to ensure proper fusion and avoid issues like undercutting or incomplete penetration.
- Overhead Position (4G for groove welds, 4F for fillet welds): This position involves welding from beneath the workpiece, requiring the welder to look up while working. It is one of the most difficult positions, as gravity works against the welder, making it essential to master techniques that help control the molten metal and ensure a strong weld.
- Pipe Welding Positions: Pipe welding can occur in various positions, including horizontal, vertical, and overhead, but is often categorized by the pipe’s orientation (like 5G for fixed horizontal pipes and 6G for inclined pipes). Each position requires specific skills and techniques due to the unique challenges they present, such as maintaining proper arc length and controlling heat input.
How Does the Flat Position Benefit Weld Quality?
The flat position is often regarded as the best welding position due to its numerous advantages that enhance weld quality.
- Gravity Assistance: In the flat position, gravity works in favor of the welder, allowing for better control of the molten weld pool. This means that the welder can easily manipulate the welding torch or electrode, resulting in more consistent and uniform welds.
- Improved Penetration: The flat position allows for better penetration of the weld material into the base metals. This deeper penetration helps to create stronger bonds and reduces the likelihood of defects such as porosity or incomplete fusion.
- Ease of Accessibility: Welders can easily access the joint in the flat position, which minimizes awkward body positions and fatigue. This accessibility allows for more precise movements and better visual monitoring of the weld quality during the process.
- Less Cleanup Required: Welds made in the flat position typically require less post-weld cleanup compared to other positions, as there is less spatter and slag to remove. This efficiency saves time and increases productivity on the job site.
- Enhanced Speed: Due to the favorable conditions provided by the flat position, welding can often be completed more quickly. The ability to maintain a steady pace without frequent adjustments contributes to faster overall project completion.
Why Is the Horizontal Position Used in Specific Welding Tasks?
According to the American Welding Society, the horizontal position is one of the most commonly utilized positions in welding due to its practical advantages, particularly in production environments where speed and quality are critical (AWS, 2021). This position facilitates the gravity assist, meaning that the molten weld pool does not fall away from the joint, which helps in maintaining the integrity of the weld. This is especially crucial in processes like MIG and TIG welding, where precision is paramount.
The underlying mechanism of why the horizontal position is beneficial lies in the physics of welding. When welding in a horizontal position, the welder can apply the correct angle of the welding torch and maintain a steady hand without the added challenge of fighting against gravity, which is often a problem in vertical or overhead welding. This stability allows for a more consistent bead and reduces the likelihood of defects such as undercuts or excessive spatter. Additionally, the horizontal position often requires less physical strain on the welder, allowing for longer working periods without fatigue, which can also contribute to improved weld quality over time.
What Challenges Come with the Vertical Position in Welding?
The vertical position in welding presents several challenges that welders must navigate to ensure quality and safety.
- Gravity Effects: Welding in a vertical position means that gravity can affect the molten metal, causing it to sag or drip if not managed properly. This requires welders to adjust their techniques, often using a weaving motion to help control the flow of the weld pool.
- Joint Accessibility: Vertical positions can make it more difficult to access the joint being welded, leading to awkward body positioning and potentially fatigue. This challenge necessitates the use of specialized tools and techniques to maintain a comfortable and effective working posture.
- Heat Control: Maintaining the correct heat input is crucial in vertical welding to avoid overheating and warping of the material. Welders must be skilled at controlling their travel speed and arc length to ensure a consistent and even weld bead.
- Weld Quality: The vertical position can lead to issues such as incomplete penetration or poor fusion if not executed correctly. To mitigate these risks, welders need to pay close attention to their settings and the welding technique employed to achieve a strong and durable weld.
- Skill Level Requirement: Vertical welding often requires a higher skill level compared to flat position welding due to the complexities involved. Beginners may struggle initially, which can lead to frustration and a longer learning curve to master the necessary techniques.
In What Situations Is the Overhead Position Necessary?
The overhead position in welding is necessary in various situations, particularly when working on structures where the weld needs to be applied from above.
- Ceiling Joists: When welding ceiling joists in construction, the overhead position is essential to ensure that the joints are securely attached and can bear the necessary loads. This position allows welders to access the upper areas without compromising the structural integrity of the framework.
- Piping Systems: In the installation of piping systems, especially in industrial settings, welders often need to work in the overhead position to connect pipes that run above other structures. This requires precision and skill to ensure that there are no leaks and that the connections are strong and reliable.
- Bridging and Overpasses: Welders working on bridges or overpasses frequently have to perform overhead welding to secure beams and supports. This position is crucial for ensuring that the welds are correctly placed to maintain safety and stability in these large-scale constructions.
- Maintenance and Repairs: In maintenance scenarios, such as repairing machinery or infrastructure that is located above head height, the overhead welding position is often necessary. This ensures that repairs are made quickly and effectively, minimizing downtime and maintaining operational efficiency.
- Shipbuilding: In shipbuilding, welding in the overhead position is common, especially when assembling components of the hull or internal structures. This position allows welders to work in confined spaces where accessibility is limited, ensuring that all parts are securely attached.
How Do I Choose the Best Welding Position for My Project?
Choosing the best welding position is crucial for achieving optimal results in your welding projects.
- Flat Position (1G/1F): This is the most common and simplest welding position where the workpiece is horizontal and the weld is performed from above. It allows for easier manipulation of the welding torch and better control over the weld, resulting in a smoother and stronger joint.
- Horizontal Position (2G/2F): In this position, the workpiece is placed horizontally, but the weld is made vertically. This method can be more challenging due to the force of gravity acting on the molten metal, but it is essential for certain applications, such as pipes and structural components.
- Vertical Position (3G/3F): The vertical position requires the welder to perform the weld on a vertical surface, which can be more difficult due to gravity. Welders often have to adjust their technique, such as moving the torch at a specific angle or using a weaving pattern, to ensure proper penetration and bead formation.
- Overhead Position (4G/4F): This challenging position involves welding upside down, requiring the welder to work from below the joint. It demands significant skill and control to prevent the molten weld from dripping, making it less ideal for inexperienced welders but essential for specific applications like ceilings or overhead structures.
- Pipe Welding Positions (1G, 2G, 5G, 6G): Pipe welding can occur in various positions, with 5G and 6G being particularly challenging since they involve welding while the pipe is in a fixed position. These positions require advanced techniques and equipment, as welders must navigate the unique challenges of cylindrical shapes and maintain consistent bead quality.
What Factors Should I Consider When Determining the Best Position?
When determining the best welding position, several key factors should be considered to ensure optimal performance and quality.
- Type of Weld: Different welding processes such as MIG, TIG, and Stick have varying requirements for position. For example, some welds may be more effectively performed in a flat position, while others may require a vertical or overhead approach for better penetration and control.
- Accessibility: The physical space and accessibility of the workpiece can greatly influence the welding position. If a joint is hard to reach, it may necessitate a position that allows for better maneuverability, such as working from above or the side, to ensure proper welding technique and safety.
- Skill Level: A welder’s experience and comfort with different positions are crucial in selecting the best approach. Beginners may find it easier to start with flat or horizontal positions, while experienced welders can adapt to more challenging positions like overhead or vertical as they develop their skills.
- Material Thickness: The thickness of the materials being welded can dictate the appropriate position. Thicker materials might require a specific angle or position to achieve the necessary heat input, whereas thinner materials can often be welded in various positions without major concerns.
- Joint Configuration: The design and configuration of the joint being welded will affect the choice of position. Some joints, such as butt joints or T-joints, may perform better in certain positions due to gravity and the need for proper alignment and penetration.
- Environmental Conditions: Factors like wind, rain, or confined spaces can influence the best welding position. Welders working outdoors may need to adjust their position to shield the weld pool from wind or to ensure adequate visibility and access in confined areas.
- Safety Concerns: Safety is paramount when selecting a welding position. Positions that minimize the risk of falling or exposure to harmful fumes or overhead hazards should be prioritized, ensuring that the welder remains safe throughout the process.
How Do the Materials I Use Influence My Welding Position Selection?
The materials used in welding significantly affect the selection of the best welding position for achieving optimal results.
- Type of Material: Different materials have varying properties that influence heat distribution and penetration.
- Thickness of Material: The thickness affects the choice of position, as thicker materials may require different techniques to ensure proper fusion.
- Material Composition: The chemical makeup of the material can determine the appropriate welding position to avoid issues like warping or cracking.
- Welding Process: The selected welding technique (MIG, TIG, Stick, etc.) can dictate the best position for efficiency and safety.
- Joint Design: The design of the joint being welded plays a crucial role in selecting the position to ensure proper accessibility and visibility.
Type of Material: Materials such as steel, aluminum, and stainless steel have different thermal conductivity and melting points, which can affect how the weld pool behaves. For instance, aluminum may require a different angle or position to account for its tendency to warp under heat.
Thickness of Material: Thicker materials may necessitate a flat or horizontal position to ensure that the welder can apply adequate heat and maintain control over the weld puddle. Conversely, thinner materials might allow for more flexibility in position, but care must be taken to prevent burn-through.
Material Composition: Certain alloys or materials may be more prone to defects if not welded in the optimal position. For example, high-carbon steels may crack if welded in vertical positions due to the rapid cooling and stress distribution.
Welding Process: Each welding process has its own ideal positions based on technique; for instance, MIG welding is often easier in a flat or horizontal position, while TIG welding can be effectively performed in various orientations depending on the welder’s skill level and the specific requirements of the job.
Joint Design: The complexity of the joint, whether it’s a butt, lap, or corner joint, influences the best welding position to ensure complete penetration and avoid gaps. A well-designed joint should allow the welder to maintain a steady hand and proper angle for the best weld quality.
Why Is Experience Important in Selecting the Right Welding Position?
Experience is crucial in selecting the right welding position because it directly influences the welder’s ability to assess the complexity of the task, anticipate challenges, and apply the appropriate techniques for optimal results.
According to a study published by the American Welding Society, experienced welders demonstrate a higher success rate in selecting positions that minimize fatigue and maximize accessibility, which significantly impacts the quality of the weld (AWS, 2020). This familiarity allows them to quickly identify the best welding position based on factors such as the type of joint, material thickness, and welding process involved.
The underlying mechanism behind this phenomenon lies in the development of muscle memory and situational awareness that comes with repeated exposure to various welding scenarios. Experienced welders are better at predicting how the welding arc behaves in different positions and can adapt their techniques accordingly. For instance, they know that welding overhead requires different posture and equipment than flat or vertical positions, and they can make informed decisions that enhance both efficiency and safety. Moreover, their understanding of heat transfer and material properties aids in selecting the most effective position to prevent issues like warping or distortion during the welding process.
What Are the Advantages of Using the Correct Welding Position?
The best welding position can significantly impact the quality and efficiency of a welding project.
- Improved Weld Quality: Using the correct welding position allows for better control over the welding arc and the molten weld pool. This leads to a more consistent bead, reducing defects such as porosity or inclusions.
- Increased Safety: Proper positioning minimizes the risk of accidents and injuries. Welders can maintain a comfortable stance, reducing strain on their bodies and preventing fatigue, which can lead to mistakes.
- Enhanced Accessibility: The right welding position provides better access to joint areas, especially in tight spaces. This ensures that welders can reach all necessary spots without awkward movements that may compromise the weld quality.
- Time Efficiency: Correct positioning can lead to quicker welding times, as it often allows for a more efficient workflow. When welders are in the optimal position, they can make faster, more precise movements, reducing the overall time spent on a project.
- Reduced Cleanup and Rework: By welding in the best position, there is a lower chance of needing to redo work due to poor welds. This minimizes material waste and saves time on cleanup efforts, ultimately leading to cost savings.
How Can the Right Welding Position Improve Safety?
The right welding position can significantly enhance safety by promoting better visibility, control, and stability while working. Here are the best welding positions to consider:
- Flat Position: This is the safest and most stable position, as the welder works with the weld facing upwards. It minimizes the risk of spatter falling onto the welder and provides better control over the welding process, reducing potential accidents.
- Horizontal Position: In this position, the weld is made on a horizontal plane, which allows for good access and visibility. It requires less physical strain compared to vertical positions, helping the welder maintain a steady hand and reducing the likelihood of accidents due to fatigue.
- Vertical Position: Although more challenging, this position can still be safe if proper techniques are used. Welders must be cautious with their stance and equipment to ensure that they maintain control, as gravity can affect the weld pool and lead to spatter if not properly managed.
- Overhead Position: This is the most difficult and potentially hazardous position, as welders are required to work above their heads. Proper safety gear and techniques are essential to prevent injuries from falling debris and to manage the heat and fumes generated during welding.
- Inclined Position: This position allows for a slight angle while welding and can provide a balance between the benefits of flat and vertical positions. It can enhance safety by allowing welders to work comfortably while still maintaining a good line of sight and control over the weld.
In What Ways Does Welding Position Affect the Final Weld Quality?
The welding position significantly influences the final weld quality due to factors like gravity, accessibility, and control over the welding process.
- Flat Position (1G/1F): This position allows welders to work on a horizontal plane, making it the easiest and most controlled position for welding. It minimizes the effects of gravity on the molten weld pool, leading to cleaner and stronger welds due to less risk of defects such as slag inclusions or excessive spatter.
- Horizontal Position (2G/2F): In this position, the weld is made on a vertical plane, though the weld bead is horizontal. This position presents some challenges since gravity can cause the weld pool to sag, making it crucial for welders to maintain proper technique and travel speed to ensure quality and prevent defects.
- Vertical Position (3G/3F): Welding in the vertical position requires advanced skills as welders must manage the downward pull of gravity while controlling the weld pool. While this position can result in less penetration and more spatter, proper technique can still yield high-quality welds, especially when using stringer beads or weaving patterns.
- Overhead Position (4G/4F): This is considered one of the most challenging welding positions since welders must work upside down. The risk of poor puddle control is high, but with the right techniques and adjustments, welders can produce strong welds; however, this position often requires more practice and skill to minimize defects.
- Pipe Welding Positions (5G/6G): These positions involve welding on pipes in various orientations, presenting unique challenges due to their curvature and the necessity for maintaining a consistent weld bead. The ability to change angles while welding is crucial in these positions, as it affects both penetration and overall weld integrity.
What Techniques Can Enhance My Skills in Welding Positions?
Several techniques can significantly enhance your skills in various welding positions:
- Practice Different Positions: Regularly practicing in multiple positions like flat, horizontal, vertical, and overhead can help you adapt to various welding scenarios. Each position challenges your control, technique, and comfort level, making you a more versatile welder.
- Use the Right Equipment: Investing in quality tools and personal protective equipment (PPE) is crucial for safety and efficiency. Proper equipment, such as a suitable welding machine and protective gear, helps ensure cleaner welds and reduces the risk of accidents.
- Learn from Professionals: Seeking guidance from experienced welders can provide valuable insights and techniques that you might not discover on your own. Observing their methods and asking questions can accelerate your learning process and improve your skills.
- Analyze Your Technique: Taking the time to review and analyze your welding technique can identify areas for improvement. Video recording your sessions or having a mentor critique your work can help you notice bad habits and refine your approach.
- Join Welding Classes or Workshops: Participating in classes or workshops can expose you to new techniques and industry standards. Learning in a structured environment with access to instructors can significantly enhance your skill set and confidence.
- Consistent Practice and Patience: Like any skill, practice is essential in welding. Setting aside regular time for practice and being patient with your progress will lead to gradual improvement and mastery of challenging positions.
What Best Practices Should I Follow to Achieve Optimal Positioning?
To achieve optimal positioning in welding, several best practices should be followed:
- Maintain the Correct Posture: Proper posture is essential in welding to ensure comfort and reduce fatigue. Keeping your back straight and your feet shoulder-width apart allows for better balance and control during the welding process.
- Use Appropriate Equipment: Selecting the right welding equipment, such as a suitable helmet, gloves, and protective clothing, is crucial. High-quality gear not only enhances safety but also provides you with a better range of motion, which is important for accessing different welding positions.
- Adjust Workpieces Securely: Ensure that the workpieces are securely clamped and positioned at a comfortable height. This prevents unnecessary strain and allows for a more ergonomic welding experience, reducing the risk of accidents and improving overall weld quality.
- Plan Your Welding Sequence: Before starting, outline a plan for your welding sequence to minimize awkward movements. By strategically planning your approach, you can maintain a comfortable position throughout the welding process, leading to more efficient work and higher-quality welds.
- Utilize Proper Lighting: Adequate lighting is vital for seeing the work area clearly and ensuring precision in your welds. Work in well-lit conditions or use additional task lighting to avoid straining your eyes and to enhance your ability to make accurate welds.
- Take Breaks to Avoid Fatigue: Welding can be physically demanding, so taking regular breaks is important. These breaks can help you maintain focus, prevent muscle fatigue, and ultimately lead to better performance and safety.
- Practice Different Positions: Familiarize yourself with various welding positions, such as flat, horizontal, vertical, and overhead. Practicing in different positions will increase your versatility and skill, making you a more proficient welder.
How Can Regular Training Improve My Positioning Skills in Welding?
Understanding Joint Design: Knowledge of different joint designs and their optimal welding positions is crucial, as it influences the quality and strength of the weld. Understanding how joint geometry affects welding positions enables welders to select the best methods for each specific task.
Related Post: